- Home
- Product Categories
- Biometrics
- SparkFun Soil Moisture Sensor

SparkFun Soil Moisture Sensor
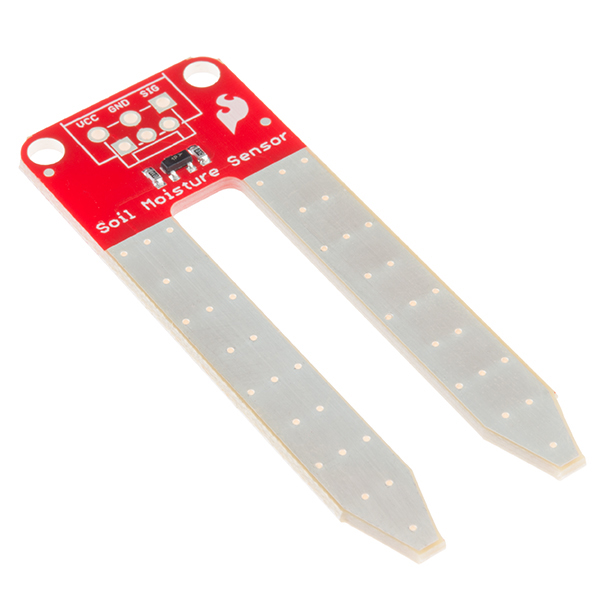
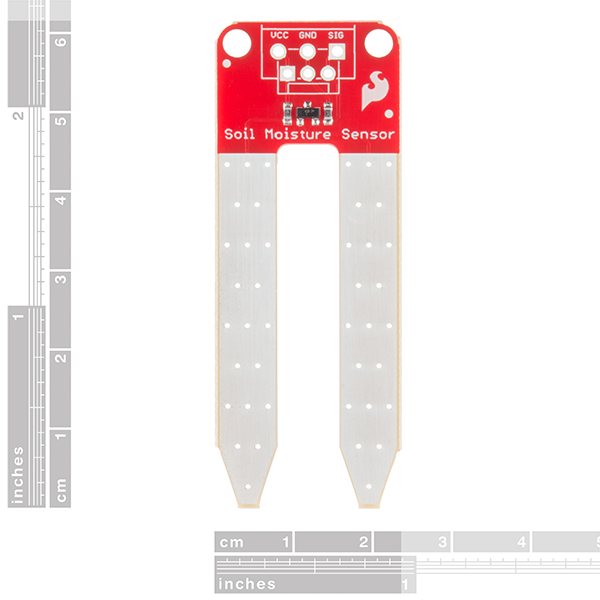
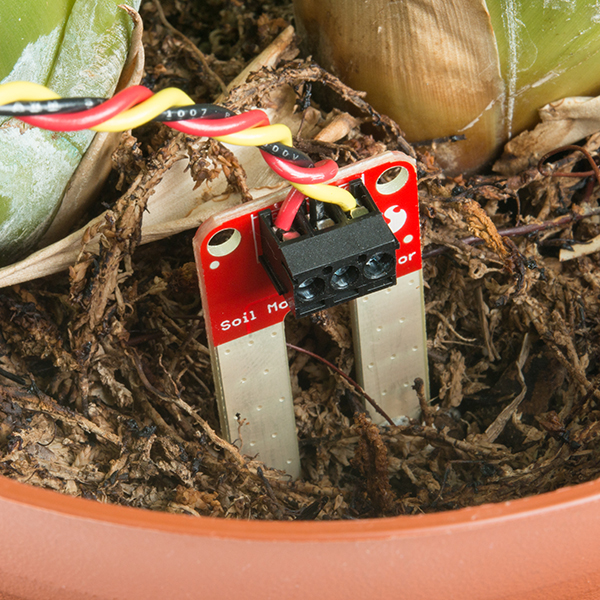
The SparkFun Soil Moisture Sensor is a simple breakout for measuring the moisture in soil and similar materials. The soil moisture sensor is pretty straight forward to use. The two large exposed pads function as probes for the sensor, together acting as a variable resistor. The more water that is in the soil means the better the conductivity between the pads will be and will result in a lower resistance, and a higher SIG out.
To get the SparkFun Soil Moisture Sensor functioning all you will need is to connect the VCC and GND pins to your Arduino-based device (or compatible development board) and you will receive a SIG out which will depend on the amount of water in the soil. One commonly known issue with soil moisture senors is their short lifespan when exposed to a moist environment. To combat this, we’ve had the PCB coated in Gold Finishing (ENIG or Electroless Nickel Immersion Gold). We recommend either a simple 3-pin screw pin terminal or a 3-pin jumper wire assembly (both can be found in the Recommended Products section below) to be soldered onto the sensor for easy wiring.
Note: Check the Hookup Guide below for assembly and weatherproofing instructions as well as a simple example project that you can put to together yourself!
SparkFun Soil Moisture Sensor Product Help and Resources
BadgerHack: Sensor Add-On Kit
February 16, 2016
Turn your Badger or Redstick into a temperature and soil moisture sensing display with the BadgerHack Sensor Add-On Kit
Logging Data to Google Sheets with the Tessel 2
December 12, 2016
This project covers how to log data to Google Sheets two ways: using IFTTT with a web connection or a USB pen drive and "sneakernet" without.
SparkFun Inventor's Kit for Photon Experiment Guide
September 3, 2015
Dive into the world of the Internet of Things with the SparkFun Inventor's Kit for Photon.
Experiment Guide for the Johnny-Five Inventor's Kit
June 28, 2016
Use the Tessel 2 and the Johnny Five Inventors kit to explore the world of JavaScript enabled hardware through 14 awesome experiments!
Blynk Board Project Guide
March 25, 2016
A series of Blynk projects you can set up on the Blynk Board without ever re-programming it.
Soil Moisture Sensor Hookup Guide
January 29, 2021
A quick hookup guide and project to get you started with the Soil Moisture Sensor from SparkFun.
Core Skill: Soldering
This skill defines how difficult the soldering is on a particular product. It might be a couple simple solder joints, or require special reflow tools.
Skill Level: Noob - Some basic soldering is required, but it is limited to a just a few pins, basic through-hole soldering, and couple (if any) polarized components. A basic soldering iron is all you should need.
See all skill levels
Core Skill: Programming
If a board needs code or communicates somehow, you're going to need to know how to program or interface with it. The programming skill is all about communication and code.
Skill Level: Rookie - You will need a better fundamental understand of what code is, and how it works. You will be using beginner-level software and development tools like Arduino. You will be dealing directly with code, but numerous examples and libraries are available. Sensors or shields will communicate with serial or TTL.
See all skill levels
Core Skill: Electrical Prototyping
If it requires power, you need to know how much, what all the pins do, and how to hook it up. You may need to reference datasheets, schematics, and know the ins and outs of electronics.
Skill Level: Rookie - You may be required to know a bit more about the component, such as orientation, or how to hook it up, in addition to power requirements. You will need to understand polarized components.
See all skill levels
Comments
Looking for answers to technical questions?
We welcome your comments and suggestions below. However, if you are looking for solutions to technical questions please see our Technical Assistance page.
Customer Reviews
4.4 out of 5
Based on 16 ratings:
1 of 1 found this helpful:
Works great
We can integrate it with our PLC or another circuit for our project . It is easy to use with or without an arduino board. The only thing we need now is something like this to use as a PH sensor :)
1 of 1 found this helpful:
Easy to setup and configure
It was easy to get it setup and configured. I'm working on solar power and bluetooth le for it, for some outdoor planters I'd like to keep an eye on. A fun little project to hack on!
Easy to get started
Only 5 minutes after unpacking I had the sensor set up in soil and was running a barebones program to display the reading on the serial plotter. Easy for beginners and a great sensor to try things out on the Arduino.
The Wiring with the LCD is difficult.
With your tutorial it says that both the sensor and the LCD light should be connected to the 5 volt input. The tutorial doesn't give us an idea of how the LCD should be connected with the RedBoard along with the sensor. If you guys can explain how to connect everything, that would be helpful.
Hey sorry to hear about the difficulty with the LCD. It is a little tricky of us not to show the pin connections I agree.
If you're looking for a quick solution though, you can look at the code real quick on the LCD, where it declares which pins are connected to the LCD: // Attach the serial display's RX line to digital pin 2 SoftwareSerial mySerial(3,2); // pin 2 = TX, pin 3 = RX (unused)
That, and making sure that the device has power and common ground would be what you need to do to hookup the LCD in the setup.
Hope that helps!
Love the sensors
Like the fact that the reading is zero when there is no water but goes the reading goes 800+ when dipped in water. Wish Sparkfun also sold three post terminals that can be soldered to the moisture sensors.
Just what I needed!
Easy to wire and use, super sensible to humidity, even if you touch it, but you just set the threshold and you'll be ok!
Worked as advertized
soldered a few wires on and it worked like a charm connected to and A/D then to a RasPi for a Smart Gardening Project.
It's good
It is stable. But when I wait 3 sec. after activating the sensor it gives considerably lower readings. Best regards torben
Do not put it in soil, do not expose to moisture.
I put the leads in the soil because I assumed a soil moisture sensor is designed to measure the soil moisture. Stupid me, every child knows electronics dont work very well in moisture. I was getting very inconsistent readings going lower and lower until finally it stopped giving me any read. I pulled it our of the ground and I found out that one lead corroded and wore off leaving just the PCB plastic. That was within 2 months and most of my readings was garbage as I could not correlate them throughout the weeks. I am using another one for just water detection and no soil but Im afraid it will also corrode.
Hello, and sorry to hear you're having trouble. Send us an email to techsupport@sparkfun.com and we can help you with this issue.
Moisture Sensor
I have had two moisture sensors in the ground for about three weeks and they have performed without any signs of degradation. Be sure to moisture proof the top portion of the the probe to prevent corrosion buildup. Excellent product.
Worked great!
I bought two of these, and they worked great out of the box! Also, until I read the hookup guide, I'd had no idea how easy it is to apply conformal coat. It's quite easy.
One side note: I tested these things out by hooking them up to an ADC board (https://www.adafruit.com/product/1083) and comparing the dry reading against the reading from shorting together the two electrodes. At first, I had a software bug, which made me think that one was giving me a very different reading than the other. But since I soldered wires directly to the board, then applied conformal coat prior to testing them, it's hard to check if it's just a bad solder joint, or if one of the resistors is populated differently, or what. In the end, I found the software bug, so it wasn't a big deal.
So my recommendation is: 1) buy these if you need them, and 2) check your work with a multimeter BEFORE applying conformal coat. It'll save you some questioning later.
I'm using these for an automatic plant watering project, and am posting source files and designs here: https://github.com/jwalthour/GreenThumb I hope this helps someone!
Works just fine!
See at https://github.com/OlivierLD/raspberry-coffee/blob/master/Project.Trunk/PlantWateringSystem/README.md (bottom of the page)
Major component to project
I am using this device to monitor the moisture content of my work farm. I can log in remotely and get status. Works great.
Newish Sensor to me.
I have tried out this sensor with a sketch and it seems to me a newbi to work a/ok.
AAA. Great little monitor
Having the chip right on the sensor is handy for protoyping w/o extra wires/boards
OK, so here is the problem with this design: the output voltage changes as a function of the parameter hFE of the on board transistor given a fixed impedance at the probe (hFE spec 70-300 but I've measured as high as 470) AND hFE is temperature dependent. What does this mean: The probes are not interchangeable given fixed software defined "moisture" thresholds; If you were to calibrate each probe at room temperature and you take a measurement at 100F it will read much "moister" than one taken at 72F. So if you squint your eyes and wave your hands you will see that the output voltage is proportional to hFE and inversely proportional to the probe impedance - simple fix: add a P-FET to short the probes in order calibrate before each measurement (this takes the temperature out of the equation given the next part), move the probe resistor to the base to give operating headroom for control of the P-FET and increase the probe resistor to a value of 10s to 100s of Kohms (small changes in the probe resistance + probe resistor result in a relatively constant linear change in output voltage over a large variation in hFE).
I'm adding 5 of these on one arduino, and planned on powering them from a digital pin. I am assuming that too much current for a single arduino digital pin. I am not super at electronics, so I was wondering if anyone had advice on an example circuit to power the vcc pin on all 5? I would normally go for a transistor as a switch, but given the vcc pin just goes to one probe pin, I am a bit uncertain how to wire that up, as usually a transistor as a switch powers the vcc to a device (such as an led) then a gnd comes out of the device and into the collector of a npn transistor, but that doesnt seem to work here... any suggestions?
Hi guys. I'm using this sensor. Do you know how I can calculate the percentage of humidity?
Hello, this sensor acts more like a qualitative soil moisture sensor, sensing the presence of moisture or not. It is not necessarily a quantitative sensor that can give you an exact reading of how moist or humid the soil is. It is difficult to design a soil moisture sensor that can give you those quantitative numbers due to the varying different types of soil and their different conductive characteristics.
I have been using this sensor for about 3 months. The a/d converter is 1024 counts for full scale (3.3V) and I calibrated by taking a sample of my garden soil, weighing it dry then adding water to saturation. As the soil dried, I weighed the container and recorded the adc counts and the weight. I found that the sensor output curve flattens at low water values and high water values but is pretty linear in the range 800 - 880 counts (2.6 - 2.8 ).
In the Garden, the probe is powered only a few microseconds once each minute so I have not observed any corrosion issues.
From observation, it appears that the sensor output is also dependent on temperature (lower voltage for cool temperature; higher for warm). Consequently my garden generally gets watered near dawn when the temperature is lowest.
Has anyone else noticed this dependency? or have any temperature data?
It seems that on this product and many others the sale price has gone away? Was it supposed to last until the end of today?
Is it possible to use this with 3.3V outputs? I'm attempting to provide power with the digital i/o pins on a Particle Photon.
Yes, you can power it with 3.3V. We have a spot specifically for the Soil Moisture Sensor on our Photon Weather Shield. You'll just have a different range of analog readings than if you were powering it with 5V.
Check out my instructable : http://www.instructables.com/id/Thirsty-Flamingo/
Very cool. Thanks for sharing! I added a link to your project from our hookup guide.
Thanks! More to come :)
The corrosion problem really is a thing. Not only does it kill your sensors in a pretty short time, but in my home garden the resulting electrolysis (I think that's what it's called) resulted in soil that was toxic to my plants. Nothing grew in the containers that I had the sensors in. The containers without sensors grew great. As has been suggested by the datasheet and other people on here, not constantly powering the sensor was critical for my success. My system was Arduino based, so all I did was power the sensor through a transistor that I enabled with a digital IO pin from my Arduino. The function that read that sensor powered the sensor on, read the value and then powered it back off. I think the sensor was powered on for less than 20mS over the course of an hour.
I'm not really that smart, and haven't played with RTCs yet (although I keep buying them...they look great in my part bin!) so I simply incremented a counter at the beginning of the MSensorRead() function. When that counter hit 50,000 (I think it was) I read the sensor, and ignored it the rest of the time.
Quick video I did showing the sensor reading/displaying: http://www.dagobah-system.com/node/31 watch closely next to the moisture reading value.
Kinda sad that SF went the resistive route. Capacitive (though a bit more expensive), has none of the corrosion issues of one like this. I built a similar sensor out of galvanized nails, and it rusted to nothing in about 3 months.
I understand ENIG is more expensive but the extended reliability is worth it, especially since no one will notice the "DO NOT POWER CONSTANTLY" annotation in the schematic.
ENIG? Please expand.
Google "ENIG soil" and you'll find ENIG = "Electroless nickel immersion gold "
Heh. I just Googled "ENIG soil" and the top result was this page. :) Here's the Wikipedia article on ENIG. It's basically a method of gold plating to prevent/reduce corrosion.
I'm trying to characterize these sensors so I set up a little experiment with soil from my garden. I took a soil sample and dried it in the oven (before my girlfriend woke up and found out what I was doing in the kitchen). I let it bake at ~150F for an hour occasionally mixing, this seem to produce very dry soil. I made a Mariotte's bottle out of a water bottle to provide a constant yet very slow way to add water to the soil. Here is a quick picture of the soil in the bottom half of a Gatorade bottle with the constant flow water bottle on top. The issue I'm having is that the soil water content doesn't seem to correspond linearly with sensor output voltage. At some point it jumps up to ~4.7 V and stays there. Her is my recorded data of sensor output voltage vs time and the approximate moisture content of the soil vs time. Are there any soils experts out there that could chyme in, I'm quite happy with the little sensors I'm just trying to get the voltage to water content relationship established before deploying them outside.
I love the smell of science in the morning. Smells like ........ victory.
Wouldnt a device like this make the soil sour through eletrolysis of the hydrogen? Ive thought of building many devices like this myself but i dont think its good for the plant. also if there is any copper, its very bad aswell. A simple copper nail can kill an entire tree ive heard.
I too am having trouble confirming that the output is as it should be. With the probe NOT inserted in soil, I get a reading of about 8. In dry-ish soil it was about 3300, and then in saturated soil it went DOWN to about 3200. Also as I slowly added water every so often, I wasn't get a nice consistent change in the reading. Can anyone comment on this? FYI i'm going into a Photo board. thanks
My electronics students noticed a sentence in the description, as of 2015-10-25: "The two large exposed pads function as probes for the sensor, together acting as a variable resistor." Sparkfun might instead write "The two large exposed pads function as probes for the sensor, together acting as legs on a variable resistor." The variable resistor itself, in this case, is the variably moist soil between the probes. Perhaps a completely different sentence would be appropriate.
Is there a max voltage with which I can safely power these? Working on a project that uses 12V external power and I'd like to rig up a few of these in parallel from the same power source.
nice hobby sensor ... probably not ideal for large commercial applications or sensors that will stay in the ground for many years ... but for 5 bucks you probably cant beat it ... most of the commercial ag sensors run in the hundreds (although I suppose you get better accuracy for that extra money, and support, and less corrosion, or replacements in the event of corrosion) Decagon sensors are very nice ... but cost alot more... (this looks like it was maybe based off of Decagons 10HS sensor)
Depending on the dimensions, some plaster of paris and a popsicle tray might make perfect sensorsicles. Not sure how much that helps with corrosion though.
I suppose one could use this with a Particle Photon and be able to get notification on my phone when the soil needs more moisture. Yes?
You are correct. That will even be one of the experiments in our Photon Inventors Kit, coming out next month.
This sensor is just screaming "Connect me to an XBee!!!" - and I will if I can come up with a decent power supply for the XBee and sensor(s).
Could we get a little more information on "encasing in gypsum" to extend sensor life? I think more than a few of your customers are interested in this for controlling drip/sprinkler irrigation schemes for larger gardens and the info would be helpful.
Are there any data suggesting how long this board will actually survive in soil? I'm considering using some of these to help control the sprinklers in my home automation system. I don't want to go to all the trouble of running wires, etc, if it's only going to last a year... cheers, Doug
What is the danger of constant power? Corrosion on the probes? Looking at the schematic it's just biasing a 3904. I don't see the problem.
I think you're correct regarding corrosion. If you read reviews on Amazon for similar sensors, many people reference corrosion issues.
I wonder if it's possible to reverse the voltage and therefore the corrosion?
yes, but it doesn't reverse the corrosion, it just corrodes both sides of the probe half as fast, instead of one.
Although corrosion might be an issue (which I have not experienced), continuous excitation may cause the sensor to exceed government specified limits on electromagnetic emissions.