- Home
- Product Categories
- Raspberry Pi HATs
- Raspberry Pi LCD - 7" Touchscreen

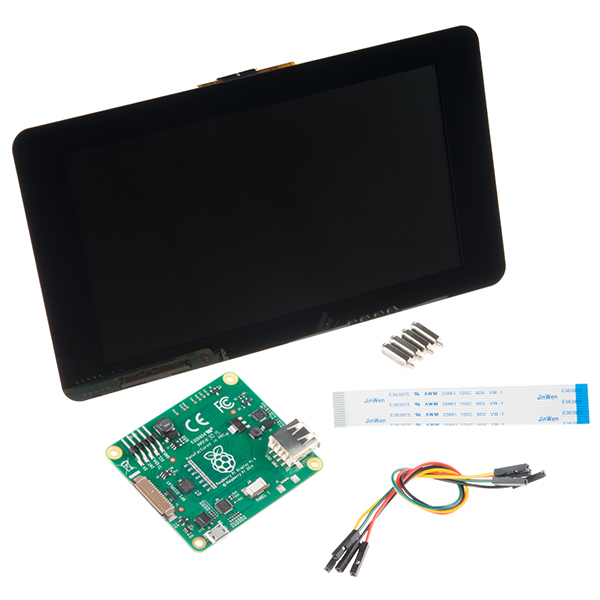
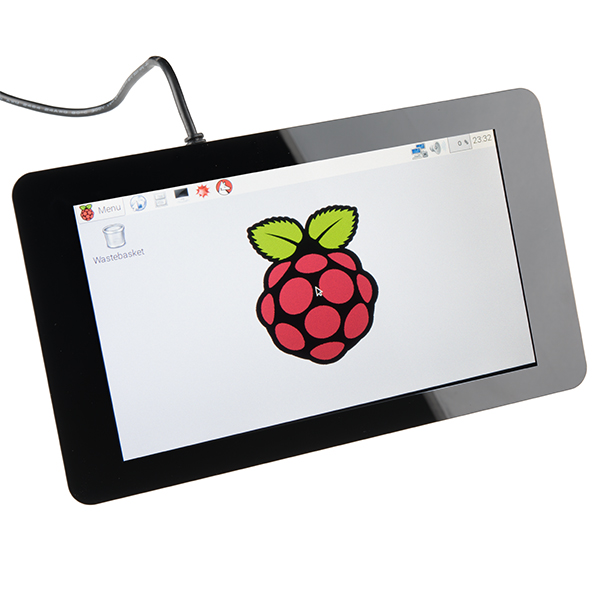
This 7" Raspberry Pi Touchscreen LCD provides you with the ability to create a standalone device that can be utilized as a custom tablet or an all-in-one interactive interface for a future project using your Raspberry Pi 3. Each LCD features a full color 800 x 480 capacitive touch display that connects to the Pi via an included adapter board which handles all of your power and signal conversion needs. An updated version of Raspbian OS on the A+, B+ and Pi2B is required for the display to work (the display does not work with the current version of Raspbian available on the Model A or B).
What makes this LCD great is the fact that it only requires two connections to be hooked up to the Pi; power from the Pi’s GPIO port and a ribbon cable that connects to the DSI port present on all Raspberry Pi's. Touchscreen drivers with support for 10-finger touch and an on-screen keyboard allow you to use your Raspberry Pi without an external keyboard or mouse.
With this Raspberry Pi LCD you can create your own ‘Internet of Things’ (IoT) devices including a visual display by simply connecting your Pi, developing a easy Python script to interact with the display, and you’ll be ready to create your own home automation devices with touch screen capability.
Note: The latest version of Raspbian OS is required for this Raspberry Pi LCD to operate correctly.
- 7” Touchscreen Display
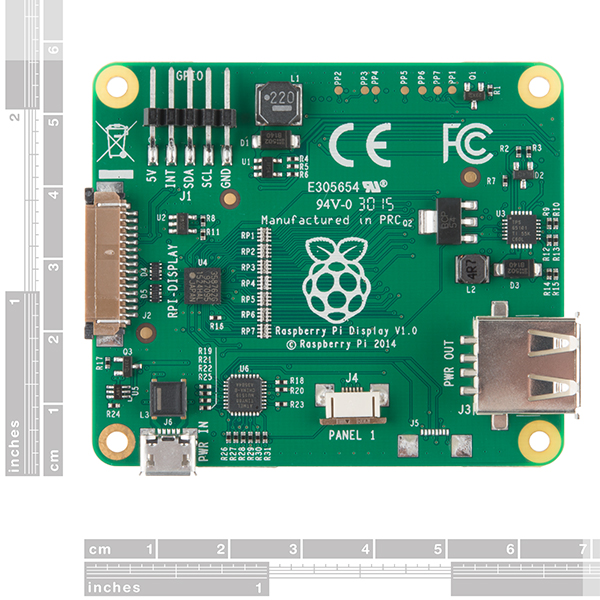
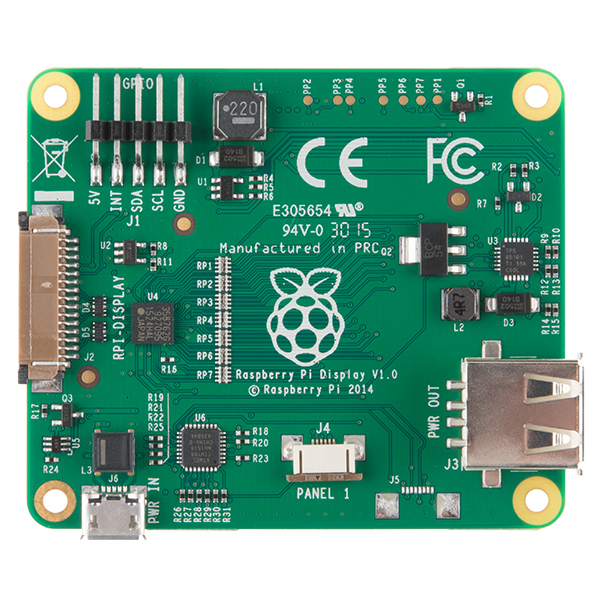
- Adapter Board
- DSI Ribbon cable
- 4 x stand-offs and screws
- 4 x jumper wires
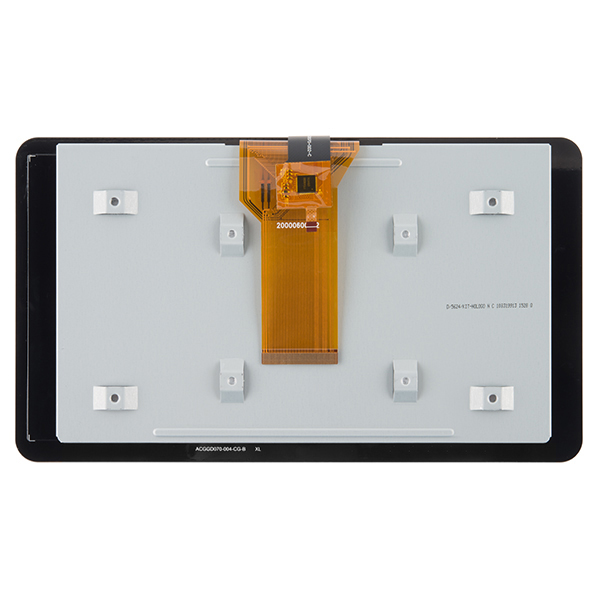
- 7” Touchscreen Display.
- Screen Dimensions: 194mm x 110mm x 20mm (including standoffs)
- Viewable screen size: 155mm x 86mm
- 70 degree viewing angle
- Screen Resolution 800 x 480 pixels @ 60fps
- 24-bit color
- 10 finger capacitive touch.
- Connects to the Raspberry Pi board using a ribbon cable connected to the DSI port.
- Adapter board is used to power the display and convert the parallel signals from the display to the serial (DSI) port on the Raspberry Pi.
Raspberry Pi LCD - 7" Touchscreen Product Help and Resources
How to Run a Raspberry Pi Program on Startup
September 18, 2018
In this tutorial, we look at various methods for running a script or program automatically whenever your Raspberry Pi (or other Linux computer) boots up.
Graph Sensor Data with Python and Matplotlib
July 23, 2018
Use matplotlib to create a real-time plot of temperature data collected from a TMP102 sensor connected to a Raspberry Pi.
Python GUI Guide: Introduction to Tkinter
August 13, 2018
Tkinter is the standard graphical user interface package that comes with Python. This tutorial will show you how to create basic windowed applications as well as complete full-screen dashboard examples complete with live graph updates from matplotlib.
Python Programming Tutorial: Getting Started with the Raspberry Pi
June 27, 2018
This guide will show you how to write programs on your Raspberry Pi using Python to control hardware.
Instructions for updating NOOBS to enable the Pi LCD.
If your SC card doesn’t have the latest version of NOOBS on it, you probably don’t have display drivers installed to enable the LCD. There are a few ways to get this working. The easiest is to download a new SD card image from the Raspberry Pi foundation and install that to your SD card. To do that:
- Download this file and save it to your computer. https://downloads.raspberrypi.org/raspbian_latest
- Format your card on a computer to get it ready for NOOBS. If you have Windows, use this SD card format utility https://www.sdcard.org/downloads/formatter_4/eula_windows/SDFormatterv4.zip to prepare the card for use. If you have a Mac, the OS X Disk Utility is also capable of formatting the card. To do this, select the SD card volume and choose Erase with MS-DOS format.
- After the card has been prepared, unzip the NOOBS files you downloaded earlier to the card.
- Now remove the card from your computer and insert it in your Raspberry Pi. Plug in an HDMI monitor keyboard an mouse. Power the Pi and follow the prompts to install NOOBS.
- After installation is complete, shutdown and power the Pi off. Remove the HDMI monitor and reapply power.
- Your Pi LCD should now be working.
If you do not want to start fresh, you can update an existing SD card by doing the following:
- Connect your Pi to the internet via either the Ethernet jack, or WiFi.
- Open a terminal window in the GUI.
- Type the following command and press enter. sudo apt-get update
- The Pi will download the necessary files it needs to update. This may take a while depending on your internet speed.
- Once that completes, enter the following command and press enter. sudo apt-get install
- The updates will take a while to install. Give it time while it does it’s thing.
- Once the updates finish installing, enter the following commands sudo reboot
- Your Pi LCD should now be working.
1 of 1 found this helpful:
Version difference on the screens, possible issues with older NOOBs images.
Previous screens had a version 1.0 controller board and the newer (pre assembled) ones have version 1.1 boards. Older versions of NOOBS DO NOT WORK with the newer screens even if they worked with the older 1.0 screens. Running 'sudo apt-get update' and 'sudo apt-get upgrade' will update an older card and enable the newer screens though. NOOBS 1.7.0 also works out of the box. You will need a HDMI monitor OR SSH in remotely to do the upgrade procedure because the screen won't work until after it completes.
Nothing displaying on the screen?
If the screen is not displaying anything on the screen, common issues using the LCD include:
1.) OS image version (latest v1.7 works fine)
2.) Drivers for your Raspberry Pi model
3.) Your power supply to power the LCD (5V/1A worked fine but the specs recommend 5V/1.8A)
4.) The ribbon cable is not connected properly to the connectors
5.) Traces on the ribbon cable have been pulled. Try looking at your connections and do not jam the wires into the connectors. In one case, a customer had jammed the cable into the connector so a trace was not connecting properly.
Core Skill: Programming
If a board needs code or communicates somehow, you're going to need to know how to program or interface with it. The programming skill is all about communication and code.
Skill Level: Competent - The toolchain for programming is a bit more complex and will examples may not be explicitly provided for you. You will be required to have a fundamental knowledge of programming and be required to provide your own code. You may need to modify existing libraries or code to work with your specific hardware. Sensor and hardware interfaces will be SPI or I2C.
See all skill levels
Core Skill: Electrical Prototyping
If it requires power, you need to know how much, what all the pins do, and how to hook it up. You may need to reference datasheets, schematics, and know the ins and outs of electronics.
Skill Level: Rookie - You may be required to know a bit more about the component, such as orientation, or how to hook it up, in addition to power requirements. You will need to understand polarized components.
See all skill levels
Comments
Looking for answers to technical questions?
We welcome your comments and suggestions below. However, if you are looking for solutions to technical questions please see our Technical Assistance page.
Customer Reviews
4.5 out of 5
Based on 51 ratings:
3 of 3 found this helpful:
Nice touchscreen, easy installation
This was easy to install and it looks good. The Touchscreen is responsive and clear, but you might want to use a stylus. The only issue i had is finding a case for it. You'll want to get one right away, unless you have a 3D printer to make one yourself. The screen is really thin, so I didn't want to carry it around without some protection. Overall, it's a great touchscreen, especially for the price, and I like that it is Raspi-branded.
1 of 1 found this helpful:
Great screen! Although a little fragile...
This screen worked right out of the box! Touch worked great with my new pi 3! However aside how fragile the (non functional) edges are, the only real issue I see is upon shutdown of the pi... The screen goes through a series of screen washes/whiteouts and never really shuts off.. I have to pull power to get it to turn off.. I've even tried usb/provided jumper wires.. And both results in the same thing. Not sure if this an issue per se, but it is bothersome.. I can just turn the unit off, I need to unplug it too..
2 of 2 found this helpful:
7" Touchscreen works GREAT
I'm using it to run a lighting and irrigation system for my house. The color graphical interface allows me to use BMP images of my house and yard for control screens, and its built into an enclosure set into the wall for a slick professional look. I even put an access from the backside of the wall for wiring it without having to remove the Pi or the touchscreen.
1 of 1 found this helpful:
Awesome screen - works great with Windows IoT Core.
Very nice, crisp and bright screen. Works with Windows IoT Core v10.0.14366.0 developer preview - quite stable.
2 of 2 found this helpful:
Really awesome for the money
Great responsiveness, inexpensive, can't beat 10-finger multi touch! The python demos are really neat, too. Only gripe is that the screen isn't oleophobic, but for the price I'll take it!
7 of 10 found this helpful:
Nice product but touch panel and display LCD break apart
I purchased 5 touchscreen. Two before and three in January. Touch and display quality is superb. After two-three month of use (no rough use; handled with care), display LCD and front touchpanel (black bezel) break apart. They both are connected using a thin double sided tape. I was planning to use in industrial environment but after such issue, I dropped my plan to use it in industrial environment.
Five of two displays are not in good condition. First display's touch-panel and display LCD was break apart after two-three month. The second among five displays had another issue. Display LCD was mounted slightly right side of the touchpanel. Once you power-up display, it is easily be seen that LCD panel was a bit off-side. The other display's screen guard having so many scratches on them which seems mishandling.
Since I'm living outside of USA, it is not feasible to get replacement of the display as it is much costly to send it back via courier.
I expected quality displays from Raspberry Pi Foundation. I hope, they will improve their display quality as well as handling mechanism.
So far, so good
I purchased this to tinker with. So far, all is going well.
Works as expected, very nice
I am using Raspberry Pi 3. The display came up with no problems. I am just waiting for the Smarti Pi Touch enclosure (pre-ordered after the Kickstarter project closed) before continuing to work with it.
Quite a good little screen!
Basically, it 'does what it says on the tin'. It's bright, relatively responsive and has acceptable color. Haven't played much with the touch screen part of it yet, but very pleased so far!
The only question(s) that I have are regarding what sort of additional processor power is inside the screen, and whether powering it from the micro-usb connection whilst also bridged from the RPi3 is an issue (it hasn't hurt anything, yet!).
Not perfect but quite nice.
Pros: Easy to connect - after watching the video. Nice that a mouse and my fingers can both be used at the same time. Sharp text is usable even when tiny in size. Colors seem bright and saturated. Nice that I can control the backlight via software - since I am using it as an alarm clock screen and need a very dim display at night.
Cons: Some "bleed through" - if that is the correct term - of light when the screen is black. No convenient mounting points - like a screw hole in each corner, or similar. I still haven't figured out a good way to mount it in a non-standard box. Somewhat limited in viewing angle. Brightness falls off unless looking dead on.
Upside down
I WAS DISAPOINTED THAT THE UNIT DISPLAYS EVERYTHING UPSIDE DOWN. I HAD TO USE THE LCD_ROTATE=2 COMMAND IN CONFIG.TXT TO FIX IT. THE INITIAL BOOT IS STILL UPSIDE DOWN BUT I GUESS AFTER IT READ THE CONFIG.TXT, IT FLIPS. SHOULDN'T IT COME STANDARD RIGHT SIDE UP?
Hmmm, it should, and this isn't an issue we've seen before. I would suggest getting in touch with our Tech Support team, they should be able to help you out.
Great addition to my Raspberry Pi
Great addition to the Raspberry Pi.
Pros: Excellent quality screen. Easy to assemble.
Cons: ??
Notes: Purchase or build an enclosure. This thing is a little fragile to exist on its own outside of some sort of enclosure.
Works Great.
Works like great. I also bought the case Which I love except you can not get to the SD card once it build. I use a small wireless keyboard so it nice combo. I Can Throw it in my back pack when I go to work too. This allow me more time to play with it.
Best thing I ever have and owned
0 of 1 found this helpful:
retro
With so many, phone and tablets that have hi res screens, this is disappointing. It does what it's supposed to, but has a retro look. Non techy relatives are not impressed.
The must annoying feature is the bright white screen when it loses signal as the OS shuts down. The touch input is inconsistent as input. I was using the I2C for a device was not able to get it going on the alternate I2C, but fortunately the required clock and data are on the DSI cable ... wasted hours finding that out. An OLED display, higher res, and lower current draw would be really nice in the next version.
It's OK for embedded using a custom case but the low end case for desktop is awful. The injection molded ones are much better.
I forgot to check..
I forgot to check that this LCD touchscreen don't have a case. Much better that you have a notification (e.g. recommending the user to purchase also a case) when purchasing this kind of product. But thank you for this product, I will purchase again soon.
Works wonderfully.
I got this along with an SmartiPi touch case, and wow, do they fit nicely together ;-)
The only minor drawback that everyone should be aware (which is to be expected, honestly) is that the display draws quite a noticeable amount of current. The SmartiPi case comes with an splitter USB cable for the power source, but if you expect to use that, be prepared with a (very) beefy power supply, else you'll get the thunder icon on the screen all the time and a very reduced performance (Just discovered that the RPi3 reduces its own clock when power is low).
I currently power this with a separate 1.5Amp supply for the screen and a 2Amp supply for the RPi3 and everything works just nice. This totals to a whopping 3.5A, which may be overkill, but keep that in mind as a reference.
Otherwise, I'm enjoying myself so much with this portable Retropie jig that I wish I didn't have a full time job.
Perfect
I received this touchscreen on time and in perfect condition. I quite recommend SparkFun.
Beautiful Screen!
I am impressed with this screen, I also got the mating case (SmartPi Touch) and it assembled nicely. With the separate case, the included jumpers and cable are not needed. The PCB was already attached with the standoffs. The packaging was super! The screen is slightly larger than 7 inches. I measured it as 7 5/8" wide X 4 3/8 high with a diagonal measurement of 8 9/16.
Needs instructions
Works very well, but I haven't found reliable instructions. Internet search turns up lots of hits, mostly unreliable. Doesn't work with the OSMC I have, and I haven't had time to track down the problem. Didn't find anything in the official blogs.
Wonderful
Nice and crisp screen. Very responsive. I have no complaints.
Easy Installation
This official Raspberry Pi 7" touchscreens now come with the display controller already connected and mounted to the back of the display. You still need to be careful pulling forward the small black tab ends that connect a ribbon cable to the RPi.
Review the SparkFun documentation before assembling.
Works as advertised
I bought the companion enclosure as well. This Touchscreen works exactly as described. I am very pleased with the display. I ended up using a mouse anyway as the icons (while clear are very tiny) and selection areas are a bit small for fat fingers.
I connected it to a Raspberry Pi 3 B running Stretch and it seems to be working perfectly. I had been previously driving a VGA monitor from HDMI through an adapter. The RPI 7" screen started up just fine without changing or installing anything with the OS.
I connected it to a Raspberry Pi 3 B running Stretch and it seems to be working perfectly. I had been previously driving a VGA monitor from HDMI through an adapter. The RPI 7" screen started up just fine without changing or installing anything with the OS.
Pretty impressive display
Bought this a week or so ago and just got it up. Display is impressive, works great (could use a little more resolution, but ...)
Based on other comments here and looking at one of these at a maker space, I bought the smartipi touch case for this; it's strongly constructed and works great. Only issue was that I'm using this with a model 3 B+, and that takes a different door on the back than comes with the case (this is being fixed by the smartipi folks, but I don't know the logistics of getting their new cases into Sparkfun)
I'll be using this as a home automation/weather station display; looks like it'll work great.
Nice monitor.
It gets rid of a full sized monitor, which is great.. I gave a full system to my grandson for Christmas. After we put it together, his first question was, can I use it for home work?. All I need for it now is a Ups type battery charger for 5volts. It,s now sitting proudly on my aircraft instrument panel.
works and looks great
I have tried other touch screens for the Raspberry Pi. They had complicated assembly and were very difficult to get them to work. This unit was easy to install and get working, is very nice looking. I am very Happy with it.
very good product
Its very useful for my project, because i can see the parameters (like temperature, humidity and other more). The first touchscreen has a problem (dead pixels), and Sparkfun send me a new replace. Really thanks for this help.
easy to set up, cheap
Right out of the box it worked. Didn't even have to do anything to the RPi (in fact, both were taken out of the box at the same time, connected, and worked on the first power up). Screen quality is good for price. Also ordered the "SmartPi Touch" case which holds everything together very nicely.
Good, but some
Ordered it, a Raspberry Pi 3 B+, and a power supply. (Had a mouse, keyboard, and uSD on hand.). It came a couple of days ago, and I put together yesterday. Had noticed in the documentation that there's a micro USB power input, and a standard USB output. In the configuration where the power supply is plugged directly into the Pi and the LCD interface is powered via a USB cable plugged into one of the Pi's USB ports to the LCD's micro USB, the LCD won't light up at all. When the power supply is plugged into the LCD controller board and the USB cable connects power to the Pi, I get "low voltage" warnings (yellow "lightning bold"). When I use the provided F/F jumpers, it works fine, but this will cause problems plugging in other "hats", as well as clearance problems. (In my application, separate power supplies would be a BIG PROBLEM.) BTW, I checked with two different USB cables, and got the same problems as well as when I tried an Adafruit 5.25V power supply. (I was about to try a second RPi3B+ when the original one stopped booting. Fortunately I had another that I'd been using as a "pass-around" sample at talks, and fortunately when I tried it, it still worked, so now the "dead" one will be passed around!) Also, it could prove really useful to know what size those mounting screws are in case they get lost! Ace Hardware recently opened a new store about half a mile from my house!
Really sharp looking piece
Title sums it up as, I purchased for rainy day projects and has not yet been used, It appears it may be physically fragile........to be expected until installed in a proper housing, will look at other's projects for Ideas....
Looks great. Works great.
Easy to connect. Worked right out of the box. No need for VooDoo or chicken blood. In 15 minutes, I was watching YouTube videos.
Portable, perfect for setting up Pis
The screen is portable enough to take with you and the Pi will use it with no configuration change when it's powered up. Used it to set up several Raspberry Pis in a remote lab. Touch screen is nice but bring along a keyboard if you have to do any setup work. One thing to make it better, replace the jumper wires with a ribbon cable connected to 1x5 and 2x2 pin headers.
One of five
I have a Raspberry Pi in each room of my home and they run a Kiosk interface for home automation, cameras and more. I've tried some cheaper ones and none have survived. (I'm hard on equipment) I haven't managed to break one of these yet.
works well with little configuration needed.
Using in a custom printed enclosure for an Octopi installation. works well.
PI LCD
Got a PI3+, 7" touchscreen and SmartPI case for manufacture test. I put these together and booted the latest Raspbian. The LCD and touchscreen connect to the display connector using a short FPC cable. The display booted and the touch screen just worked out of the box. There were some nice but not well documented improvements. They provide a Y USB cable to power both the PI and the LCD. This is a cleaner solution than the jumper wires they provide.I'm not a big fan of using lego blocks in a industrial environment but the case went together easily and does a decent job of protecting the display and the PI. Some reported a inverted display issue but that seems to have been resolved.
Great Quality
Product works perfect. Has a great looking and quality. Recommended
Good design and it's official!
A truly plug-and-play display for the Raspberry Pi. Does not steal any additional extension connector pins if you power it with a USB power supply and leaves the I2C1 interface available for other devices.
Big enough for somewhat squinting actual Raspberry PI development and computer work, but really shines for touch screen optimized large button control panels.
You can just install a Pi3 or 4 on the back, but with a 4 you really need some additional airflow. The SmartiPi Touch 2 enclosure works better. https://www.sparkfun.com/products/16302
Works as it should.
It works fine, no glitches, no problems, no hair pulling moments. Once electrically connected to my RPi 3B+ it's good to go. I run it with the "lite" version of the Raspberry Pi OS with only xorg drivers installed, no full desktop or windows manager, as part of an in-the-field project with a HQ camera attached. My only complaint is the ribbon cable could stand to be about 6 inches longer.
I love it and plan to buy more.
It works great, the colors are beautiful, and finger touch works fine. What I like most is that the Raspberry Pi GPIO pins are all still available - except for one +5v pin and one Ground pin. Both are redundant (i.e. others are available). So, this is not an issue at all. I also like that data connects to the Pi via the IPS ribbon cable. Another thing I like is that power connects to the Pi via two jumper wires. The Pi is fussy about its power supply voltage. So, the jumper wires are better because they are heavier gouge than a small PCB trace.
great 7" display for Raspi
very bright, really good viewing angles, nice touch LCD, super easy to connect and setup. Sparkfun delivered ahead of time and they are easy to work with. I connect a Pi v4 and put the whole thing in the SmartPI Touch 2 case from Sparkfun and now it looks pretty professional. Make sure you use a good power supply.
Where's the documentation?
Where is the documentation? This thing is so poorly documented it's almost a joke. The whole point of the RPi ecosystem is to enable Makers and learning about electronics, so why isn't this fully documented?
It's perfect
Screen looks great and very responsive to touch. I love how the Pi mounts to the back.
Perfect for portable utility applications
I used this to build a portable utility/testing device for my company. It works fantastic with the SmartiPi Touch Pro Case on Amazon. The touchscreen functions great, only thing is you can't register mousedown and mouseup events in Chromium (only click). Other than that it's great!
Works Great!
I got it working the first try, easy to follow instructions. Trying to learn Kivy with Python for touch screen programming, That's a lot more difficult.
Great display for a Pi
It's bright, clear, good color rendition. Touch input is responsive and accurate. Trivial to assemble and get going. Like the multiple power options. Would buy again.
0 of 1 found this helpful:
Great display, solid touchscreen
Overall, very good product. Works as intended.
It says this in the description, but just in case you missed it, the original models A & B do not work with this display. You need an A+, B+, or Pi2B
Brilliant purchase
Works great. Easy to hook up and configure.
The only drawback is that I wish there was a case I could purchase for it. I have seen 3D files for printing your own, but I do not have a 3D printer (yet).
Overall, it works wonderfully.
Freaking awesome display for embedded projects!!!
I got a couple of these for several RPi projects that Im developing and they are working amazingly well for the application. If these fit your application needs I wouldn't hesitate to recommend them. /JR
The 'for scale' objects in the 3D viewer aren't the right size. Probably a units mismatch. Please correct so the Mars Climate Orbiter will not have crashed in vain.
---------- Tech Support Tips/Troubleshooting/Common Issues ----------
If the screen is not displaying anything on the screen, common issues using the LCD include:
1.) OS image version (latest v1.7 works fine)
2.) Drivers for your Raspberry Pi model
3.) Your power supply to power the LCD (5V/1A worked fine but the specs recommend 5V/1.8A). If your power supply is 5V/2A and powering the Raspberry Pi, you can also use the power from the 5V and GND GPIO pins.
4.) The ribbon cable is not connected properly to the connectors
5.) Traces on the ribbon cable have been pulled. Try looking at your connections and do not jam the wires into the connectors. In one case, a customer had jammed the cable into the connector so a trace was not connecting properly.
What are the dimensions of the display, mounting holes and bezel? This information is strangely absent.
Will this work with Windows IoT? Thank you
I didn't see it in the store, but do you also sell replacement DSI Ribbon Cables?
Does this have an integrated backlight? It isn't specified and is critical to the application I have in mind. If so, can the description be modified to include this bit of info?
Got it for my birthday, didn't disappoint.** the only weird thing is it came with the adapter board already installed. **
Will it work on a Pi2 running Ubuntu Mate or only Raspbian?
Does any one know if this will work for the pcDuino 3?
from the description, this is Raspbian only? will this work with Windows IoT Core on RaspberryPi2?
I have this working on Raspberry Pi 3 with Windows 10 Iot version 10.0.14993.1000.
i got it to work, but i have the windows insider one. it also works with retropie but the touch doesnt work.
I was not able to get it to work with windows IoT (non insider version) out of the box. There wasn't much information on how to get it working at the time (about a month ago) last I searched (1 month ago).
Does thus work seamlessly with the RaspberryPi 2 as well? It's bit confusing the part about a new Raspbian
You need to have Raspbian Jessie to properly use this display. Wheezy might work but it's not supported.
Is there an easy way to power the RPi with batteries? I would like to be able to use this on the go with my pi, like a tablet
I've had pretty good success with a portable USB charger (i.e. a battery with a USB-A port). Anker is the best brand I've come across. And thanks, rEgLer, for the 1A tip. Any of the powerCore series I've seen supply at least 2A per port.
I'd suggest you buy a tablet. $60 gets a lot of tablet these days. Lots of ways to hook up any misc hardware via the USB port. In the end it will be a better screen, faster machine and more portable.
My setup with a Raspberry Pi 2 and the screen consumes about 1A @ 5Vdc. You would need a large battery and boost-buck voltage regulator to truly make it portable.