- Home
- Product Categories
- Weather
- SparkFun Environmental Combo Breakout - CCS811/BME280 (Qwiic)


SparkFun Environmental Combo Breakout - CCS811/BME280 (Qwiic)
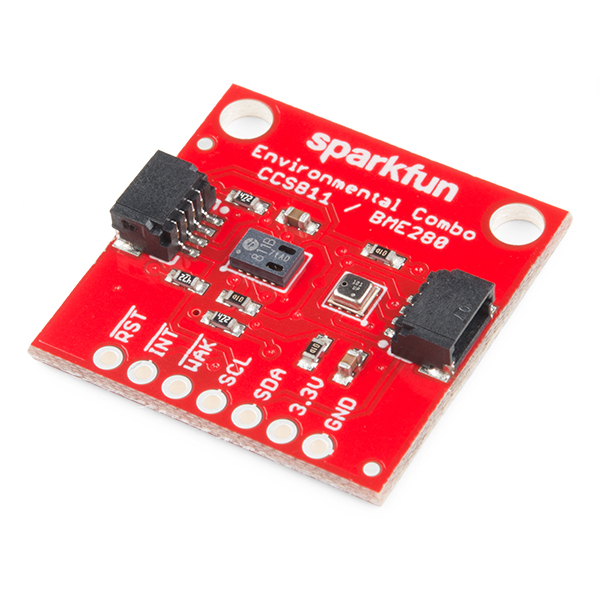
The SparkFun CCS811/BME280 Environmental Combo Breakout takes care of all your atmospheric-quality sensing needs with the popular CCS811 and BME280 ICs. This unique breakout provides a variety of environmental data, including barometric pressure, humidity, temperature, TVOCs and equivalent CO2 (or eCO2) levels. To make it even easier to use this breakout, all communication is enacted exclusively via I2C, utilizing our handy Qwiic system. However, we still have broken out 0.1" spaced pins in case you prefer to use a breadboard.
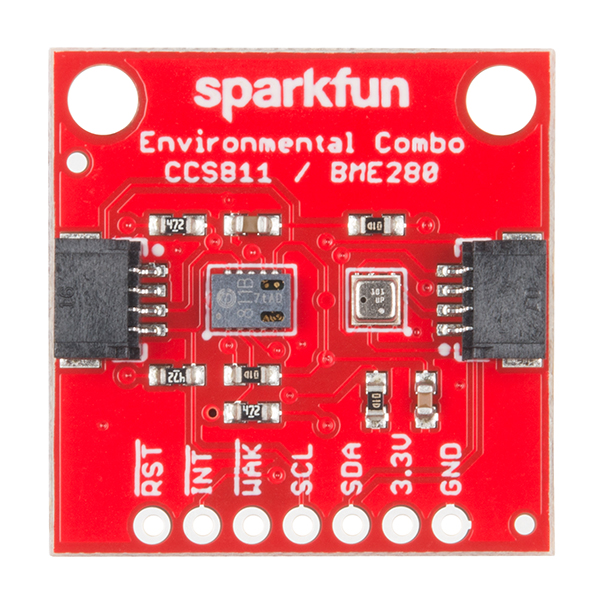
The CCS811 is an exceedingly popular sensor, providing readings for equivalent CO2 (or eCO2) in the parts per million (PPM) and total volatile organic compounds in the parts per billion (PPB). The CCS811 also has a feature that allows it to fine-tune its readings if it has access to the current humidity and temperature. Luckily for us, the BME280 provides humidity, temperature and barometric pressure! This allows the sensors to work together to give us more accurate readings than they’d be able to provide on their own. We also made it easy to interface with them via I2C.
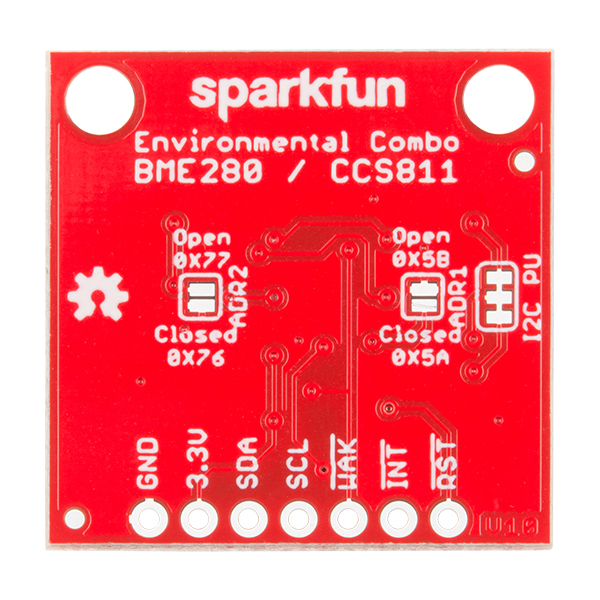
Note: The I2C address of the Environmental Combo Breakout is 0x77 / 0x5B and is jumper selectable to 0x76 / 0x5A. A multiplexer/Mux is required to communicate to multiple Environmental Combo Breakout sensors on a single bus. If you need to use more than one Environmental Combo Breakout sensor consider using the Qwiic Mux Breakout.
The SparkFun Qwiic Connect System is an ecosystem of I2C sensors, actuators, shields and cables that make prototyping faster and less prone to error. All Qwiic-enabled boards use a common 1mm pitch, 4-pin JST connector. This reduces the amount of required PCB space, and polarized connections mean you can’t hook it up wrong.
The Environmental Combo Breakout can also be automatically detected, scanned, configured, and logged using the OpenLog Artemis datalogger system. No programming, soldering, or setup required!
- Qwiic-Connector Enabled
- Operation Voltage: 3.3V
- Total Volatile Organic Compound (TVOC) sensing from 0 to 1,187 parts per billion
- eCO2 sensing from 400 to 8,192 parts per million
- Temp Range: -40C to 85C
- Humidity Range: 0--100% RH, =-3% from 20--80%
- Pressure Range: 30,000Pa to 110,000Pa, relative accuracy of 12Pa, absolute accuracy of 100Pa
- Altitude Range: 0 to 30,000 feet (9.2 km), relative accuracy of 3.3 feet (1m) at sea level, 6.6 (2m) at 30,000 feet
- Schematic
- Eagle Files
- Qwiic Page
- Hookup Guide
- Qwiic Page
- Datasheets
- Arduino Libraries
- GitHub
SparkFun Environmental Combo Breakout - CCS811/BME280 (Qwiic) Product Help and Resources
CCS811/BME280 (Qwiic) Environmental Combo Breakout Hookup Guide
September 8, 2017
Sense various environmental conditions such as temperature, humidity, barometric pressure, eCO2 and tVOCs with the CCS811 and BME280 combo breakout board.
Sending Sensor Data Over WiFi
January 16, 2022
This tutorial will show you how setup a simple peer-to-peer connection to send and receive sensor data between two ESP32 WiFi boards.
Core Skill: Programming
If a board needs code or communicates somehow, you're going to need to know how to program or interface with it. The programming skill is all about communication and code.
Skill Level: Competent - The toolchain for programming is a bit more complex and will examples may not be explicitly provided for you. You will be required to have a fundamental knowledge of programming and be required to provide your own code. You may need to modify existing libraries or code to work with your specific hardware. Sensor and hardware interfaces will be SPI or I2C.
See all skill levels
Core Skill: Electrical Prototyping
If it requires power, you need to know how much, what all the pins do, and how to hook it up. You may need to reference datasheets, schematics, and know the ins and outs of electronics.
Skill Level: Rookie - You may be required to know a bit more about the component, such as orientation, or how to hook it up, in addition to power requirements. You will need to understand polarized components.
See all skill levels
Comments
Looking for answers to technical questions?
We welcome your comments and suggestions below. However, if you are looking for solutions to technical questions please see our Technical Assistance page.
Customer Reviews
3.2 out of 5
Based on 20 ratings:
4 of 4 found this helpful:
Design flaw. Runs very hot.
The CCS811 is way too close to the BME280 and heats the temperature sensor up significantly. My BME280 on this board read 5-10 degrees F above the actual temperature. Since every everything else (humidity, TVOC, and eCO2) the sensor outputs except pressure is affected by the temperature, those values are likely to be off as well.
When I contacted support about this, they confirmed that the two sensors were too close together to get accurate temperature readings and suggested using an offset in my code.
It seems to me that they should redesign this board or at least warn people since they know these boards run very hot.
3 of 3 found this helpful:
Sensors affect each other
The CCS811 sensor generates heat when it is operating. This heat impacts the temperature readings of the BME280 sensor. It was only after I re-read the hookup guide and saw "The BME280 is unable to compensate for the heat produced by the CCS811" that I realized why my temperature readings were incorrect. My advice would be to purchase separate BME280 and CCS811 boards so they aren't a few mm away.
3 of 3 found this helpful:
Mostly OK for indoor use, heating issue makes it harder to use
Unfortunately, I have to agree with other comments regarding the heating issue and that making it harder to use this effectively. At the end of the day, any simple compensation mechanism is dependent on the maintaining fairly consistent ambient conditions for sensor board. This generally means keeping it indoors and away from active heating/cooling sources.
The CCS811 sensor causes heating of the BME280. SF does sort-of note this in the device guide, and allude to a need for the user to compensate for this themselves. However, this really feels insufficient, and the statement in the guide isn't all that clear (the product page comments are much clearer).
After implementing a basic temperature compensation function, my guess is that you'll need to decrease the effective accuracy of the sensor readings by 0.5-1.0C after compensation. This is still usable, but the additional decrease in accuracy is a bit disappointing. Perhaps SF can write a more sophisticated compensation function that reduces this additional source of error.
All in all, if you're not prepared to do some extra work, I'd avoid this board until it's redesigned to address the heating issue.
Recommendations for SF:
- SF should implement a calibration function in their library for the BME280 to address this issue. It really seems like an SF issue, and a bit of work on this would go a ways towards a better customer experience.
- Clarify the text about the issue in the sensor guide. The statement "The BME280 is unable to compensate for the heat produced by the CCS811" is misleading. It seems pretty clear this is a board design issue, not a BME280 issue. The guide statement implies it's a BME280 issue (maybe marketing got too involved in that statement? :) )
Finally, here's a quick and dirty calibration function. It assumes a constant ambient temperature, that both sensors are at ambient/room temperature at the start, and that any heating from the CCS811 is consistent after 25 mins (20 min sensor burn-in time +5 mins). Unfortunately, this means a quick reset will result in issues. Saving some calibration information to the on-chip flash could work around this somewhat.
I use this once in the setup() function, immediately following BME280 initialization and before initialization of the CCS811. Then call it once in the loop() function, subtracting the return value from the measured value. Technically, this methodolgy opens things up for a bit of additional error, as we're checking the temp twice (once in the calibration function, and again in loop()). Although if we assume the error settles down after ~25 mins, this seems acceptable for general home use in most cases. I'm sure there are other ways error can slip in with this approach, and a class based approach is probably better, but it's a start...
//function declaration, put this at the top of the .ino file, just below any #include statements
float calibrateBMETemp(unsigned int delayMins = 25);

float calibrateBMETemp(unsigned int delayMins = 25) {
  static unsigned char BMECalState = 0;
  static unsigned long initialMs = 0;
  static float firstBMEtempC = 0.0;
  static float BMEtempCal = 0.0;

  float BMEtempC = 0.0;
  unsigned long delayMs = 0;

  if (delayMins == 0) {
    //default delay is 20 mins
    delayMs = 20 * 60 * 1000L;
  } else {
    delayMs = (long) delayMins * 60 * 1000;
  }

  /* Serial.print("Calibration delay ms: ");
  Serial.println(delayMs); */

  /* States
   * 0 - unintialized
   * 1 - initial temp collected, waiting for delay period
   * 2 - second temp collected, calibration complete
   */
  switch (BMECalState) {
    case 0:
      firstBMEtempC = myBME280.readTempC();
      initialMs = millis();
      BMECalState = 1;
      break;
    case 1:
      BMEtempC = myBME280.readTempC();
      BMEtempCal = BMEtempC - firstBMEtempC;

      if (millis() - initialMs > delayMs) {
        BMECalState = 2;
      }
      break;
    case 2:
      //nothing to do in this state
      break;
    default:
      //error if this actually occurs
      Serial.print("ERROR: invalid calibration state encountered (");
      Serial.print(BMECalState);
      Serial.println(")");
      break;
  }

  return BMEtempCal;
}
2 of 2 found this helpful:
Avoid if you need accurate or precise data
As others have found the design of this board is sub-optimal. While I have yet to confirm by thermal imaging, I believe the issue is due to the heat from the CCS811 affecting readings from the BME280. Given the interelation between temp, humidity and pressure, I have not been able to use the board for it intended purpose.
I have tried deactivating the CCS811 by pulling the WAK pin high and not initialising it via I2C, and while this does improve things, the error is still there. My next step to try and salvage some value from this product is to try and cut out the CCS811. I don't feel the workaround suggested in the hookup guide is worth implementing as it is an inelegant bodge which adds complexity. However it may do for others who don't need accurate data.
If you need both chips, this beginner recommends buying separate chips and locating them away from each other.
1 of 1 found this helpful:
BME280 OK, CCS811 is junk
The BME280 portion of this combo works fine. The CCS811, not so much. It was wildly inaccurate when running the test program. Then when I connected it to the I2C port on the Sparkfun Weather Shield, it didn't work at all. But the BME280 portion still worked. Go figure.
My recommendation: forget about measuring CO2 with this and buy a simple BME280-only sensor. This combo is a nice idea but it doesn't work. Sorry.
3 of 3 found this helpful:
Works but deeply flawed
Yes those 2 sensors are great, but the way they are put together (so close) nullifies both of them: - the temperature (and humidity) reading are flawed because the CCS one is heating it - the CO2/TVOC readings are then flawed if you apply the temperature reading to calibrate
So at the end, you get wrong data. The only decent (maybe) data is the pressure.
2 of 2 found this helpful:
Interesting devices
The devices on this board give you more decimal places than are useful. Seems to work OK but I had trouble with SparkFun libraries. The Arduino IDE complains and says it cannot use the library. After a long time troubleshooting I found the answer; which is to remove the dash ( - ) characters from within the names and replace them with under bars ( _ ) then it works. As it turns out SparkFun still ships new libraries with dash characters within the names. I like SparkFun products a lot but this naming convention and IDE complaint errors set me back over 6 months. Live and learn!
3 of 3 found this helpful:
do *not* purchase this combination board
The combo board is basically useless. The CCS811 relies on Temperature to more accurately calculate eCO2 and the BME280 is inaccurate due to heat from the CCS811.
I wish I had taken the time to research this board prior to purchasing, I would have purchased both sensors separately.
I will likely be purchasing a separate BME280/680 (from elsewhere.) so I can feed this CCS811 accurate temperature data.
Disappointing and wasteful product by SparkFun, terrible first impression of the quality of engineering team.
4 of 5 found this helpful:
2 weeks in and still not working properly
I'm building a simple environmental monitor and expected that this component together with a redboard and Qwik shield should work seamlessly out of the box - as described in the Hookup guide.
Its been two weeks since the parts have arrived and this is my current status:
I've "broken in" the sensor for 48 hours - and from my experience this did not make any difference to the readings.
I've communicated that I am getting a faulty temperature reading (5-7 degrees celcius too high) to Sparkfun customer service (on my 6th email exchange now) - who has updated the hookup guide with a "New fix" (manually reduce the temp reading to compensate for over heating of BME280 produced by the CCS811).
I yesterday left the sensor plugged in over night and I woke up to the following readings: temp 25.5 (4 degrees Celcius too high), altitude -4m (24m too low), humidity 30% (10% too low), and CO2/TVOC 1,200/800 (after opening a window went down to 650/35 so probably correct) and atmospheric pressure of 101 kPa (probably ok).
To conclude, I would be happy with a setup that takes a week to configure and is 10% off in perpetuity. However my experience is that readings can be dramatically out of range - and the system is still not working properly after all the work I've put in.
Sparkfun's customer support has made no attempt to remedy this and is continuing to give generic advice (try this, why not try that?) this is from our latest correspondence when I push him about the precision of the unit: " We try to account for everything, but we mostly rely on the community to pick up on and fix issues we might have missed."
I paid a good amount of money for this kit - it is not cool for this company to expect me to do QA for them.
3 of 4 found this helpful:
Great combination of sensors somewhat hard to use
This is a great combo board for complete environmental monitoring. But I got caught out by the I2C clock stretching requirements on the ESP8266. This is not standard and had to do some hacking around to make it work.
CO2 and tVOC readings are inconsistent
Bought two of these, have them each on an RPi using QWIIC. One is in the kitchen, one is in my studio. They pretty reliable on reading around 450-550 CO2 and low VOC numbers overnight, CO2 jumps up if I breath on the sensors first thing in the morning.
However, there is a serious problem with either the QWIIC library, the hardware, or maybe my code. I'll see high CO2 numbers, up around 2000 or 3000, while I'm using the toaster oven or frying eggs on a gas stove. These numbers remain high for hours. If I restart the script that reads the device and logs the data, the CO2 level drops down to a reasonable number between 400 and 500. If it was 2000 a minute ago how can it be < 500 now?
I'm documenting this project on my blog and have a github repo, my project is an open-source indoor air quality project. I've also blogged about the hazards of gas stoves in residential kitchens: http://www.functionalprototype.com/news/2021/01/31/the-sensor-box-project/
0 of 1 found this helpful:
Cool board
Everything worked fine. The board, the libraries and the example code. I was in the process of trying to find my color touchscreen shield for it, then I found about about Nordic's Thingy:52 development kit for $40. I bought that because it will do everything I want (and more) through the smartphone, also because I still can't find my touchscreen...
All great, except...
I like everything about this sensor--size, connectors, ease of use. Unfortunately, I don't think the CO2 and temp readings are accurate. I've done the 48-hour burn-in, nd I don't pay attention to readings prior to the 20-minute point. I see others have had similar issues, but don't see an ultimate solution to the problem.
Very good product.
Working well. Very reliable.
Very useful devices!
so far everything is OK, even for Your IMU and GPS in one chain QWIIC, connected to an Arduino Nano (through Level Converter) transmitting data to an Arduino Mega through a pair of Adafruit RFM69HCW. Thank You very much for Your reliable and efficient devices.
N.B.: The 3.3V of Arduino Nano does not have enough power, so I use an external power
Interesting data, clean setup, programming can be challenging on Pi/Python
I bought this to test how environmental conditions in my house change over time as I start about 100+ plants for the summer growing season here in Boulder. I also grabbed the Qwiic HAT for the PI, so connecting it was rather trivial. That was the easy part.
Turns out most libraries for this are oriented toward Arduino.
I did manage to cobble together a couple libraries - one from adafruit, to make it work and push the data on a per minute basis to Google Cloud for analysis.
The project is located here: RaspberryPI connected CCS811/BME280 to Google Cloud - https://github.com/DzRepo/RaspberryPI-CCS811-BME280-Google-Cloud in case anyone is interested.
The CCS811 detects anytime we cook nearby in the kitchen - especially frying/oils. I don't put much credence in the eco2 reading though.
Works perfectly with Mesh/Argon/Boron Particle.io boards
Driver works with default Particle.io board I2C config which made things very simple!
For those interested, I'm getting:
SCD30 (real CO2): 431 vs this sensor's eCO2: 1576 when TVOC is >200 in my garage.
Seems to work ok...
Pros: Easy to use, no soldering, tutorial on this board nearly eliminates writing code. Con: Design of the board gives elevated temperature readings
I like the capabilities of this board, but I think the design could be improved to eliminate the error on the temperature readings. If it weren't for that, this would be a 5 star review.
Should not even exist
Honestly, I'm not sure who thought this combo board was ok to design, let alone sell. Maybe as a SparkX product, but not as a $35 red board. The CCS811 is already a but of a sketchy sensor reliability wise, but data can be improved by feeding it correction data from a reliable temperature/pressure sensor. Problem is, the CCS811 has an onboard heater to take its measurements (which also takes 20 min to warm up). As one can clearly see, the sensors are approximately 5mm apart. Yes, a temperature sensor is 5mm from a heater. How could that possibly cause any issues...
Sarcasm aside, these two sensors should not be on the same board, or if they absolutely have to be, there are measures that could be taken to decrease the inaccuracy. The BME280 could be physically farther away, or have cutouts around it (as many of SFE's other temperature sensor boards do). It is an inexcusable design flaw and I expect more from Sparkfun. I guess since this is the only Qwiic board with the CCS811 (at the time of writing), it could be useful if you want to put another BME280 chained a little ways away and use correction data from it (disabling the onboard BME280). But $35 is outrageous for a board with only one useful sensor on it.
0 of 1 found this helpful:
Bought for hackathon
I bought this for making an air quality monitoring device for a hackathon and it worked first time out of the box with the sample code. It was easy to integrate and was the most reliable part of our project. The global average CO2 is (unfortunately) above 400ppm, so the range works just fine. It agreed with the HVAC control panel for the room's CO2 so seemed to be reasonably accurate. The response time also is within a few seconds.
Will there ever be a rework for the temperature issues? This could be a great breakout, but no one purchases it because of the errors. I would love if you guys had a time of relooking at the device.
perpetual i2c errors on esp8266. works ok on a uno. someone mentioned a clock stretching issue? Will try Wire.setClockStretchLimit(500L);
What a horribly depressing output range .. I guess no need for it to go lower, sadly.
"eCO2: The equivalent CO2 (eCO2) output range for CCS811 is from 400ppm to 8192ppm. Values outside this range are clipped."
Aren't the breadboard-spaced pins 0.1", not 1mm? :)
They certainly are. I'm not sure how that was changed. All updated!
Is this possible to do without the Shield? If so, where would everything plug in to?