- Home
- Product Categories
- Flex / Force
- SparkFun Qwiic Scale - NAU7802

SparkFun Qwiic Scale - NAU7802
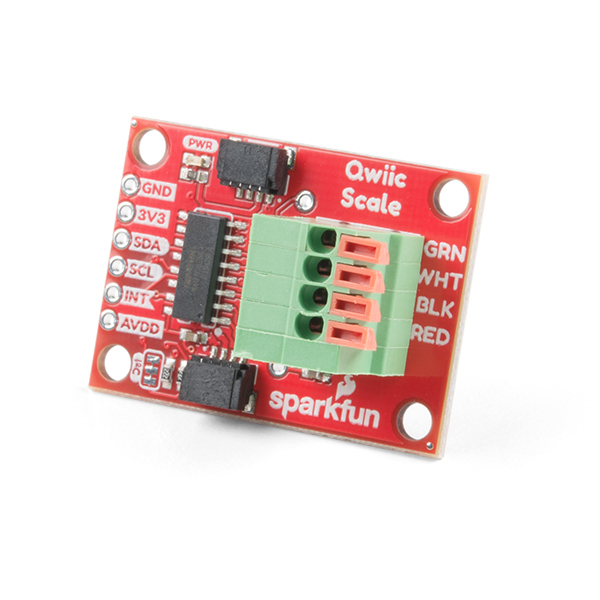
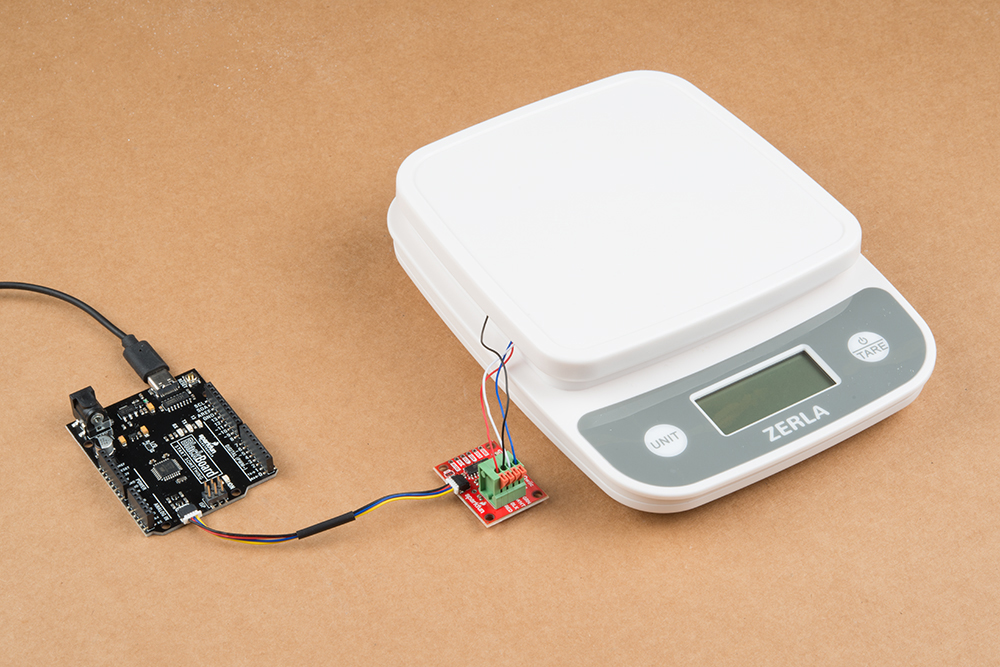
The SparkFun Qwiic Scale is a small breakout board for the NAU7802 that allows you to easily read load cells to accurately measure the weight of an object. By connecting the board to your microcontroller you will be able to read the changes in the resistance of a load cell and, with some calibration, you'll be able to get very accurate weight measurements. This can be handy for creating your own industrial scale, process control or simple presence detection. Utilizing our handy Qwiic system, no soldering is required to connect it to the rest of your system. However, we still have broken out 0.1"-spaced pins in case you prefer to use a breadboard.
By connecting a load cell to the Qwiic Scale you will be able to translate sensor data into something your microcontroller can read. The NAU7802 is an ADC with built in gain and I2C output to amplify and convert the readings from a standard load cell. A load cell is basically a device that translates pressure or force into electrical signals. In most cases this signal is very small and needs to be amplified. There are many popular chips that read the change and amplify it, but the NAU7802 goes one step further and converts everything to a true I2C output (attached to a Qwiic connector).
The board provides a four spring terminal to connect your load cell with no soldering required. In addition to the I2C pins, the board also breaks out an interrupt pin and AVDD to the edge of the board. The differential input signals (plus a second set of input signals) are broken out to the middle of the board, as well.
Note: The I2C address of the NAU7802 is 0x2A and is hardware defined. A multiplexer/Mux is required to communicate to multiple NAU7802 sensors on a single bus. If you need to use more than one NAU7802 sensor consider using the Qwiic Mux Breakout.
The SparkFun Qwiic connect system is an ecosystem of I2C sensors, actuators, shields and cables that make prototyping faster and less prone to error. All Qwiic-enabled boards use a common 1mm pitch, 4-pin JST connector. This reduces the amount of required PCB space, and polarized connections mean you can’t hook it up wrong.
The NAU7802 Qwiic Scale can also be automatically detected, scanned, configured, and logged using the OpenLog Artemis datalogger system. No programming, soldering, or setup required!
Need a custom board? This component can be found in SparkFun's À La Carte board builder. You can have a custom design fabricated with this component - and your choice of hundreds of other sensors, actuators and wireless devices - delivered to you in just a few weeks.

- Operating Voltage: 3.3V (NAU7802: 2.7V-5.5V)
- 24-bit Dual-Channel Analog to Digital Converter
- Programmable Gain Amplifier
- On-chip temperature sensor
- Simultaneous 50Hz and 60Hz rejection
- Programmable PGA gains from 1 to 128
- Programmable aDC data output rates
- External differential reference voltage range from 0.1V to 5V
- Low Power Consumption and Programmable Power Management Options
- <1uA standby current
- 2x Qwiic Connectors
SparkFun Qwiic Scale - NAU7802 Product Help and Resources
Getting Started with Load Cells
June 11, 2015
A tutorial defining what a load cell is and how to use one.
Qwiic Scale Hookup Guide
April 11, 2019
Create your own digital scale quickly and easily using the Qwiic Scale!
Core Skill: Programming
If a board needs code or communicates somehow, you're going to need to know how to program or interface with it. The programming skill is all about communication and code.
Skill Level: Competent - The toolchain for programming is a bit more complex and will examples may not be explicitly provided for you. You will be required to have a fundamental knowledge of programming and be required to provide your own code. You may need to modify existing libraries or code to work with your specific hardware. Sensor and hardware interfaces will be SPI or I2C.
See all skill levels
Core Skill: Electrical Prototyping
If it requires power, you need to know how much, what all the pins do, and how to hook it up. You may need to reference datasheets, schematics, and know the ins and outs of electronics.
Skill Level: Rookie - You may be required to know a bit more about the component, such as orientation, or how to hook it up, in addition to power requirements. You will need to understand polarized components.
See all skill levels
Comments
Looking for answers to technical questions?
We welcome your comments and suggestions below. However, if you are looking for solutions to technical questions please see our Technical Assistance page.
Customer Reviews
3.8 out of 5
Based on 10 ratings:
1 of 1 found this helpful:
Don't short your board on standoffs
I friggin' (soft language chosen for public consumption) hate boards that don't leave enough room around mounting holes for the screws that are intended to go through them. Would it kill you to leave enough room for hardware? I just wasted four hours on a standoff shorting against AVDD.
Otherwise this board (and it's excellent library) would have gotten a 5 star.
1 of 1 found this helpful:
Fast and easy to use
I'm using this with an ESP32-S2 via the Qwiic connector, running in C++/Arduino. The library is easy to use, although I've only gotten to sampling the sensor (not zeroed or tared). It's really fast, too.
My only dislike is the large spring terminal block. Since I'm retrofitting a scale for wireless use, it takes up A LOT of space for the minor benefit of plugging wires in (which ideally you won't be doing very often). I soldered a 7 pin screw terminal block to the bottom and clipped off the end of the board past it. Much nicer and tucks into my scale.
1 of 1 found this helpful:
Works great
This device works as advertised, but it did take more time to configure than I expected. This was due to the lack of documentation about the labeled thru-holes on the left side of the PC board. These holes are strangely not included on the printed schematic.
I think the designers are mostly targeting Arduino users, and for that case, the documentation seems fine. In my case, I was using a Zilog chip with my own code / libraries for I2C. In any case, I strongly recommend this product. It is well designed and an excellent value!
1 of 1 found this helpful:
Solved A Problem - Easy to Use
I was using an HX711 Load Cell Amplifier in a project but was getting inconsistent values and it was subject to interference. Finally got one of these and used their suggested libraries and the project started working as designed. Highly recommended.
The project also used a Zio Qwiic OLED Display so connecting the two was very easy and I believe the Qwiic cabling eliminated the source of the interference.
2 of 2 found this helpful:
Worked perfectly
I would have given it 5 stars if I could change the I2C address so I could run two on the same bus. As it is a MUX is required.
1 of 1 found this helpful:
Possible Improvements
Works well for what it is intended to do. However, additional accuracy could be provided with the below changes.
1) External low ppm crystal selection.
2) External voltage reference source
Works very well; easy roinstalla dn the library works great with out a problem
Quick and easy
My only regret was I didn't use a teensy 4.0 to take full advantage of the speed.
Two major design flows with the device: 1. Very sensitive to the power supply you use with your Arduino. Each power supply gives a different reading and some also add a lot of noise. Even worst, in some cases, like when hooked to a computer, the computer might change the power supply due to internal logic and lead to variabilities in the readings. 2. Like some others have mentioned, each device seems to have its own temperament. I have more than 12 of these and each behaves differently - something I wouldn't expect from an electronic device. Some are super sensitive and some are not sensitive at all and you can only hope (and pray) that you get the ones that you need.
I am not sure if this might help anyone but I have been working on a tensile testing machine using the NAU7802 and a raspberry pi. Still under development but I am able to officially calibrate(a2la/ASTM E4) load cells from 10-100% full scale.
My NAU7802 library for RPi so far: https://github.com/roundup976/NAU7802-rpi.git
Very cool! Thanks for letting us know!
Functionally the board works like the HX711, but with a 400kHz I²C bus. The spring terminal is annoyingly mammoth. You can either take some flush angle cutters and remove it, or as a reviewer said cut that entire half of the board off (not sure if you want to keep that EMI cap).
One other nuance I don't see mentioned anywhere is that the two header groups (the comm pins on the edge and the ADC pins in the middle) are not aligned. So it won't fit in a breadboard if you have both populated with pins on the bottom side.
Not letting me leave a review. The green push connector is almost not soldered to the board. It's at an angle and way of the board. Please check the quality
Some of my load cells are giving very high value when there is no load, and drop a lot after some load, and increase normally after that. I am not sure if it is a problem with the load cell of some library problems. Is there any way to troubleshoot this problem?
Hi there, it sounds like you are looking for technical assistance. Please use the link in the banner above, to get started with posting a topic in our forums. Our technical support team will do their best to assist you.
I have a load cell that needs 5 volts. Can I power the Scale board with 5 volts via step-up converter, but still use a 3.3 volts logic level microcontroller?
Yes but be careful - don't let the 5V back power the 3.3V Qwiic bus. If you're soldering to the I2C pins directly, you'll be ok.
Yes it works! The Sparkfun Scale is great. I use it in combination with a quality load cell and the results are amazing!
👍
Is there any library you can share for raspberry pi ?
We currently do not have a Python package for this product, but I did a preliminary test a few weeks ago. It should be compatible with the Raspberry Pi.
I actually just ported the Arduino library to Python. You can find it here. I'm by no means an expert in either Arduino or Python but I think it works alright. I tried to be as true as I could to SparkFun's Arduino library.
Look at that! Thank you so much.
Hello Nate,
Can you confirm this is now the official python library for NAU7802?
It looks very good and I warmly thank "flight"/"longapalooza". However, I would like to know if it has your seal of approval.
Thanks
It is not an official part of the
sparkfun-qwiicPython package. However, I tested it a while back... it seemed to at least increase the values when a weight was added.Hi, I read this line from its datasheet, "The NAU7802 is permanently programmed with "010 1010" (0x2A) as the Device Address.". Is this mean that numbers of this module are not be able to use on one arduino?
I'm planning to do some project that is reading 6 loadcells simultaneously by in one arduino and this module seems to quite fit on my project. But, I really hope to not to be needed to use I2C MUX for multiple modules.....
Unfortunately there is no way to change the I2C address so you will need a mux. It adds a layer of complexity but using a mux is not that bad ;)
Hi, I have bought 4 of these scales and work perfectly. Only I want to take temperature into consideration to compensate for the variations due to temperature. In the FEATURES it says that there is a temperature sensor On-chip. How can I get the temperature value? Could you please give an example. Thanks.
Yes, there is a temperature sensor built-in to the NAU7802 chip. Off the top of my head, I am not sure if it is implemented automatically or if there is a way to get the readings. For more details, on the temperature sensor, check out the datasheet. You can also look for or post a new topic on our forums; we will do what we can to assist.
The temperature sensor is used to calibrate/adjust the readings. It's automatic but AFAICS the temp reading is not exposed through the I2C interface.
I'm having trouble getting example1 to work. myScale.begin returns false. Which wiring is at fault? The I2C wiring or the load cell wiring? I'm using elegoo MEGA2560 R3 with a Qwiic shield board an a Qwiic cable to the Qwiic scale. I've removed the load cell wiring from the spring terminal and reinserted many times, trying to follow the recommendations in the hook up guide.
Ok, by looking at Qwiic shield schematic and reading the Wire library for MEGA types, I can succesfully connect after jumping A5 on the shield to 21 on MEGA and A4 on the shield to 20 on MEGA. Basically it seems Qwiic is designed for something other than MEGA, but work around is easy.
A failed begin means the I2C communication failed - it's your I2C wiring. I suspect the issue is with the Qwiic shield and the Mega. The shield assumes (poorly, bad design on my part) that SDA/SCL are located at A4/A5. I think the Mega doesn't have this. You'll need to wire to the I2C pins on the Mega. If you still want to use the Qwiic shield use an Uno or other platform that has I2C pins located at A4/A5.