- Home
- Product Categories
- Teensy
- Teensy 4.0

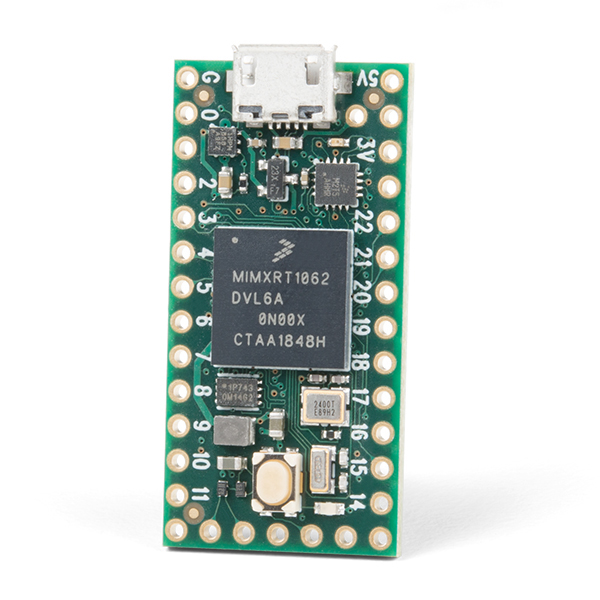
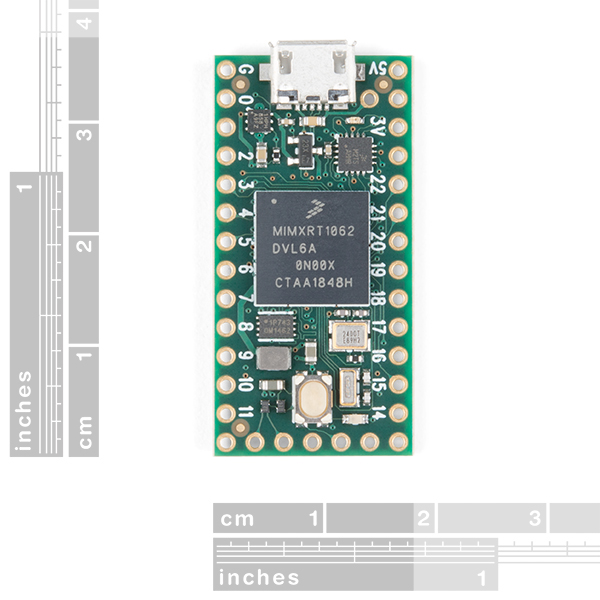
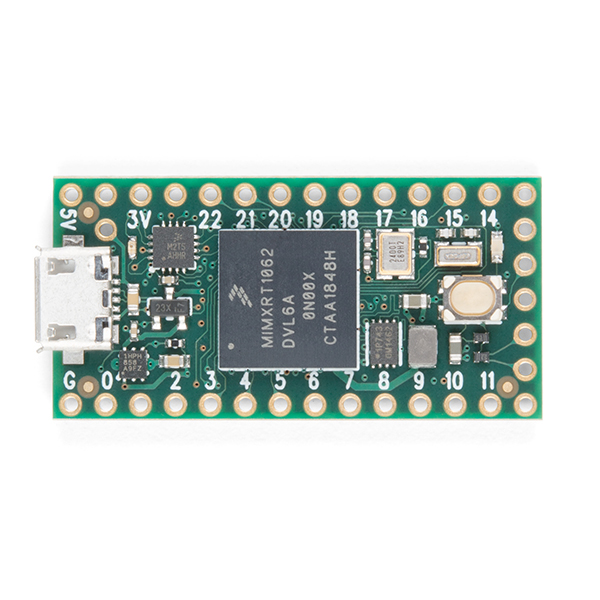
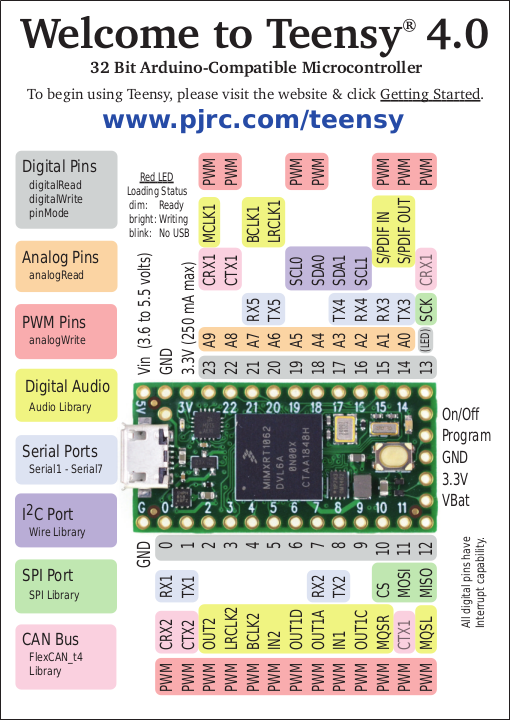
Teensy 4.0 features an ARM Cortex-M7 processor at 600MHz, with a NXP iMXRT1062 chip, the fastest microcontroller available today. Teensy 4.0 is the same size and shape as Teensy 3.2, and retains compatibility with most of the pin functions on Teensy 3.2.
When running at 600 MHz, Teensy 4.0 consumes approximately 100mA current. Teensy 4.0 provides support for dynamic clock scaling. Unlike traditional microcontrollers, where changing the clock speed causes wrong baud rates and other issues, Teensy 4.0 hardware and Teensyduino's software support for Arduino timing functions are designed to allow dynamically speed changes. Serial baud rates, audio streaming sample rates, and Arduino functions like delay() and millis(), and Teensyduino's extensions like IntervalTimer and elapsedMillis, continue to work properly while the CPU changes speed. Teensy 4.0 also provides a power shut off feature. By connecting a pushbutton to the On/Off pin, the 3.3V power supply can be completely disabled by holding the button for 5 seconds, and turned back on by a brief button press. If a coin cell is connected to VBAT, Teensy 4.0's RTC also continues to keep track of date & time while the power is off. Teensy 4.0 also can also be overclocked, well beyond 600MHz!
The ARM Cortex-M7 brings many powerful CPU features to a true real-time microcontroller platform. Cortex-M7 is a dual-issue superscaler processor, meaning the M7 can execute two instructions per clock cycle, at 600MHz! Of course, executing two simultaneously depends upon the compiler ordering instructions and registers. Initial benchmarks have shown C++ code compiled by Arduino tends to achieve two instructions about 40% to 50% of the time while performing numerically intensive work using integers and pointers. Cortex-M7 is the first ARM microcontroller to use branch prediction. On M4, loops and other code which much branch take three clock cycles. With M7, after a loop has executed a few times, the branch prediction removes that overhead, allowing the branch instruction to run in only a single clock cycle.
Tightly Coupled Memory is a special feature which allows Cortex-M7 fast single cycle access to memory using a pair of 64 bit wide buses. The ITCM bus provides a 64 bit path to fetch instructions. The DTCM bus is actually a pair of 32 bit paths, allowing M7 to perform up to two separate memory accesses in the same cycle. These extremely high speed buses are separate from M7's main AXI bus, which accesses other memory and peripherals. 512K of memory can be accessed as tightly coupled memory. Teensyduino automatically allocates your Arduino sketch code into ITCM and all non-malloc memory use to the fast DTCM, unless you add extra keywords to override the optimized default. Memory not accessed on the tightly coupled buses is optimized for DMA access by peripherals. Because the bulk of M7's memory access is done on the two tightly coupled buses, powerful DMA-based peripherals have excellent access to the non-TCM memory for highly efficient I/O.
Teensy 4.0's Cortex-M7 processor includes a floating point unit (FPU) which supports both 64 bit "double" and 32 bit "float". With M4's FPU on Teensy 3.5 & 3.6, and also Atmel SAMD51 chips, only 32 bit float is hardware accelerated. Any use of double, double functions like log(), sin(), cos() means slow software implemented math. Teensy 4.0 executes all of these with FPU hardware.
Note: Please be aware that the Teensy 4.0 does not include headers and will need to be purchased separately and soldered on yourself.
Attention: Due to supply constraints, orders may not be filled immediately; orders not allocated to immediately, will be placed on backorder and filled as inventory allows. If you are a business, distributor, or reseller, please contact sales to place your order: sales@sparkfun.com.
- ARM Cortex-M7 at 600MHz
- 1024K RAM (512K is tightly coupled)
- 2048K Flash (64K reserved for recovery & EEPROM emulation)
- 2 USB ports, both 480MBit/sec
- 3 CAN Bus (1 with CAN FD)
- 2 I2S Digital Audio
- 1 S/PDIF Digital Audio
- 1 SDIO (4 bit) native SD
- 3 SPI, all with 16 word FIFO
- 3 I2C, all with 4 byte FIFO
- 7 Serial, all with 4 byte FIFO
- 32 general purpose DMA channels
- 31 PWM pins
- 40 digital pins, all interrrupt capable
- 14 analog pins, 2 ADCs on chip
- Cryptographic Acceleration
- Random Number Generator
- RTC for date/time
- Programmable FlexIO
- Pixel Processing Pipeline
- Peripheral cross triggering
- Power On/Off management
- Datasheet (MIMXRT1062 DVL6A)
- Manual (MIMXRT1062 DVL6A)
- Datasheet (W25Q16JV-DTR)
- Teensy Quick Start
- Teensyduino Software
- Pin Assignment Charts
- Teensy Help Page and FAQ
Teensy 4.0 Product Help and Resources
Getting Started with the SmartLED Shield for Teensy
November 9, 2018
In this tutorial, we will connect different RGB LED matrix panels to PixelMatix's SmartLED shield and Teensy.
Getting Started with the Teensy
June 18, 2015
Basic intro to the Teensy line of products, with soldering and programming suggestions.
How to Load MicroPython on a Microcontroller Board
September 4, 2018
This tutorial will show you how to load the MicroPython interpreter onto a variety of development boards.
Core Skill: Soldering
This skill defines how difficult the soldering is on a particular product. It might be a couple simple solder joints, or require special reflow tools.
Skill Level: Rookie - The number of pins increases, and you will have to determine polarity of components and some of the components might be a bit trickier or close together. You might need solder wick or flux.
See all skill levels
Core Skill: Programming
If a board needs code or communicates somehow, you're going to need to know how to program or interface with it. The programming skill is all about communication and code.
Skill Level: Competent - The toolchain for programming is a bit more complex and will examples may not be explicitly provided for you. You will be required to have a fundamental knowledge of programming and be required to provide your own code. You may need to modify existing libraries or code to work with your specific hardware. Sensor and hardware interfaces will be SPI or I2C.
See all skill levels
Core Skill: Electrical Prototyping
If it requires power, you need to know how much, what all the pins do, and how to hook it up. You may need to reference datasheets, schematics, and know the ins and outs of electronics.
Skill Level: Rookie - You may be required to know a bit more about the component, such as orientation, or how to hook it up, in addition to power requirements. You will need to understand polarized components.
See all skill levels
Comments
Looking for answers to technical questions?
We welcome your comments and suggestions below. However, if you are looking for solutions to technical questions please see our Technical Assistance page.
Customer Reviews
4.6 out of 5
Based on 14 ratings:
1 of 1 found this helpful:
Solid performance, easy to use, and tons of features.
I'm using it to control an RC car with an FrSky Sbus receiver. Sbus is an inverted serial connection, which usually requires a hardware inverter, but the teensy 4.0 supports software serial inversion, so I can just connect it directly. It also has 6 hardware UART ports and a 600MHz M7 processor, so there's plenty of headroom for added features, like GPS module, S.port telemetry, and eventually a raspberry pi for autonomous navigation.
3 of 3 found this helpful:
Very good product
I primarily work with microcontrollers and am happy to have the high speed processing available with a good selection of peripherals. The most outstanding feature for me was the availability of three CAN ports. I use the Arduino IDE for convenience and was pleased with the fast upload to the board. I would like to see the addition of WiFi capability. I currently use the ESP32 platform for a lot of my work because of the builtin wireless. With WiFi, this board would cover almost all of the computing needs of an embedded system.
4 of 4 found this helpful:
Finally Found What I was Looking for...
After toying with dozens of different micro-controllers, large and small, the Teensy 4.0 came to my rescue. NXP brands the chip on the Teensy 4.0 as a crossover micro-controller which is quite accurate. The MXRT1062 has plenty of horsepower and resources to drive a real-time OS. You also get plenty of basic I/O needed for a modular designed project. All of that and it's still tiny, err, teensy.
My current project needs the following: A Lua interpreter, a real-time OS and some form of visual screen editor driven with PuTTY. The Teensy 4.0 handles all of this with room to spare. With a couple of headers I can attach the Teensy 4.0 to a larger circuit board and have it fully control all the hardware on that board. With a USB serial cable and an old laptop running PuTTY or minicom, I can field program the whole system in minutes using Lua as the onboard scripting language. The idea is to low-level program the Teensy once, then make field modifications without ever touching a Makefile or compiler ever again. The Teensy 4.0 fits this bill nicely.
You can get bigger, more powerful controllers able to run a full-blown Linux OS, but all that baggage comes at a price. The Teensy 4.0 is a right-sized controller in my opinion. It's something the market has overlooked for quite a while, but finally it's here. Give it a shot and see for yourself.
Oh and one other thing...
Speed isn't necessarily where it's all at. The Teensy 4.0 packs quite a bit of memory and flash on a single chip. I run my Teensy at 48MHz to keep it nice and cool while still performing a lot of work. But if you need to ramp this thing up for AI or Machine Learning, it can do that too, just have a decent heatsink handy, because it does get warm at higher clock speeds.
This thing is a ROCKET
Playing around with DDS (Direct Digital Synthesis) and DSP filters, this thing runs fast!
Truly spectacular
Blows away any other development board of similar size and cost. ;-)
--- sam
Great so far
Programming with Arduino IDE. I can use the wealth of existing programs as a base without worrying about running out of memory or compute power.
Beautiful piece of technology!
Super fast and reliable.
Love it!
A premium ARM chip on a dev board that can play with all the Arduino and Teensy stuff. Yes, please!
Fast and easy
Such a nice controller. The only hard part is installing the appropriate software to get it to talk, but just read the guide. This little controller is fast enough i can read out an audio wave form from 4 separate microphones and still do a bunch of math. Would recommend.
Powerful little beast
I use these often for punning hub75 matrix displays. Love them when I can get them and was happy that Sparkfun could delivery. so WOot! for the teensy family.
Speed, versatility, ease of use and there is a wealth of support and information easily available.
This is the best Arduino compatible board by far
The Teensy 4.x boards are the the best Arduino board that I have used. They are extremely versatile and fast, there is great support on the forum at https://forum.pjrc.com . The designer of the board frequents the forum and often answers people’s more complicated questions.
There are many libraries that make this board unique. The audio library for this board is amazing, and has a ton of functions. https://www.pjrc.com/teensy/td_libs_Audio.html
The raw speed of this board, makes it great for projects that need speed, while the low price makes it great for everyday applications.
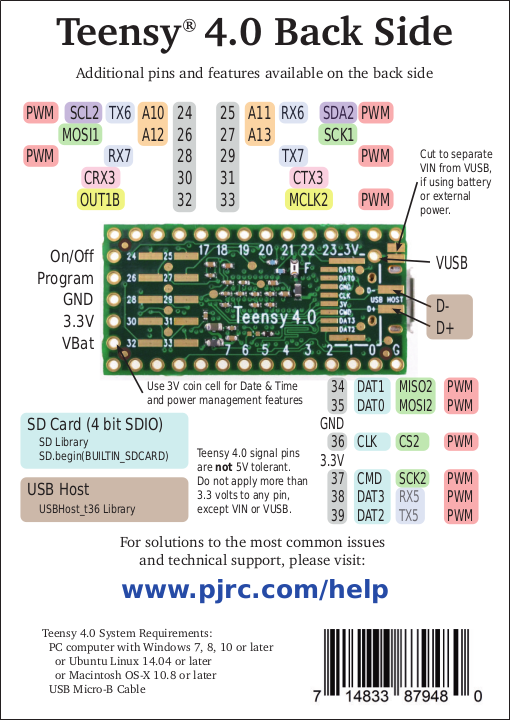
If your soldering skills are good, you can even solder a micro SD cars adapter on the bottom of the board (or you can upgrade to the Teensy 4.1)
Epic
Super overpowered. It's tiny, cheap, and super powerful. Also vast overclocking potential. USB host support is a fun bonus. Only thing I wish it had were more pins - if it weren't for that it would be 5 stars.
I would love to see this with more pins, microsd slot with SDIO support, and the USB D+ and D- broken out.
Used to Replace a NANO
I am using the Teensy 4.0 to replace a NANO which is part of a uBITX, HF, Amateur band radio. This is accomplished by using an adapter board from Triumvirate Skonk Works. This allow me to greatly expand the capabilities of the radio while incorporating additional hardware. The sketch went from using virtually all of the NANO program memory and RAM to using less that ten percent of each with the Teensy!
I have been eagerly watching Paul's development of this board! I have a couple of projects that will use this as the need the memory and speed. Also there is TensorFlow lite available for this from NXP. When I saw the release yesterday I immediately ordered four. I hope to do a local pickup this morning at 9AM. Can't wait!
All this board needs now is a QWIIC connector. :-)
I think there were plans for a shield... it may have fallen through the cracks somewhere or maybe they figured customers would prefer jumper cables instead. I'll try to follow up with what happened with that.
I'm on Linux (Manjaro), and I've been using teensy-loader-cli with previous versions of Teensy. I checked their github and Teensy4.0 is not supported, and Teensy Loader GUI is not working with 4.0 neither. What are my options (except for waiting)?
Hi there, it sounds like you are looking for technical assistance. Please use the link in the banner above, to get started with posting a topic in our forums. Our technical support team will do their best to assist you.
However, your best resource would be the PJRC forum for this question. I think it is currently limited to the teensyduino platform.
What is the maximum sampling rate from one dedicated 12 bit ADC on the Teensy 4.0? I have some high sampling rate applications in mind and was curious how fast it can go.
Hi there, it sounds like you are looking for technical assistance. Please use the link in the banner above, to get started with posting a topic in our forums. Our technical support team will do their best to assist you.
That being said, this question might be better suited for PJRC's forums (as they designed and built the Teensy 4.0). Otherwise, here is a link to the datasheet for the microprocessor used on the Teensy 4.0 that PJRC lists.
What pins are used to connect an SD card to this board? And can I use a standard SD card breakout board for this (SPI and power pins)? Thanks.
Hi there, it sounds like you are looking for technical assistance. Please use the link in the banner above, to get started with posting a topic in our forums. Our technical support team will do their best to assist you.
That being said, this question might be better suited for PJRC's forums (as they designed and built the Teensy 4.0). Otherwise, here is a link to their product page, which lists the pinouts.
The only thing I don't like is that they always sell them without the pins, and this one (4.0) shows no sign of a DAC pin/pins
Are you asking about an option with headers? I believe we do sell a few of the Teensy 3.x boards with header options and (if I remember correctly) they do have DAC pins available. I'd have to double-check the information on the 4.0.
(*Otherwise, I am not sure I understood the issue.)
Not the OP, but let me reply:
(1) A version of 4.0 with headers already attached will probably soon be available, and I hope it's soon. Some of us hate having to solder headers (as one gets older, focusing at short distances gets harder).
(2) A bigger thing is adding proper DAC to the 4.0. Yes, the 3.6 has DAC, but it looks like the 4.0 doesn't. PWM isn't quite the same thing. I'd be interested if anybody had thoughts on how best to add DAC to the 4.0.
(1) My apologies, I thought you meant we sold none of the Teensy boards (from the entire product line) with headers. Unfortunately, we don't control when/if PJRC releases a header version. From past experience, you may just need to wait. Otherwise, if you are in a rush to start developing:
(2) If you are looking for technical assistance. Please use the link in the banner above, to get started with posting a topic in our forums. Our technical support team will do their best to assist you.
That being said, this question might be better suited for PJRC's forums (as they designed and built the Teensy 4.0). Otherwise, here is a link to link to the datasheet for the microprocessor used on the Teensy 4.0 that PJRC lists. There is a note in the datasheet for a 6-bit DAC, but I am not sure if it is implemented on the board in hardware or software (teensyduino).
So much processing power, so few I/Os, so many shared pins. Sad.
How many more pins do you need and where would you put them on a board this size?
40 total...all can do digital, 31 of them can do PWM, and of course the other types of I/O are shared. But I don't see too much of the more specific I/O types that conflicts with others. What else in the same ballpark competes?
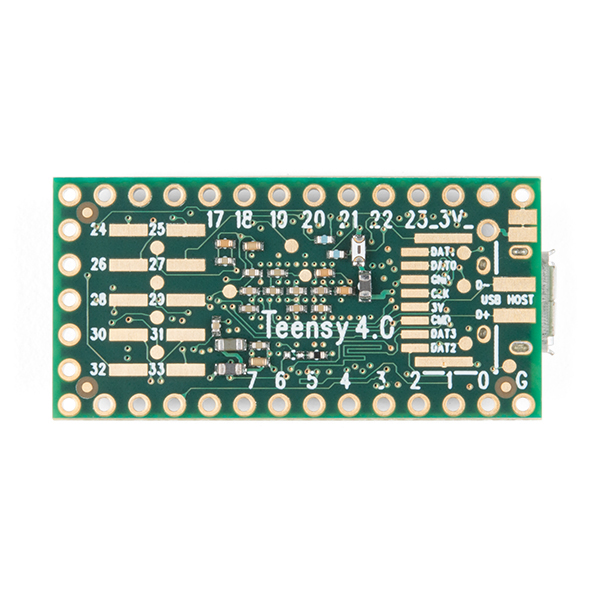
Mainly just making sure that no one misses that there are 16 more I/O connections on the underside of the board, if you need them. (Ideally a long form board could be coming at come point with all as header pins, I would like that myself.)
and how much power does it draw approximately ?
According to the product page from PJRC (the manufacturer/designer):
What's the voltage level on the I/O pins? I'm assuming 3.3v but are they 5v tolerant like the 3.5?
The pinout for the "Back Side" of the graphical datasheet indicates that: