- Home
- Product Categories
- Monochrome
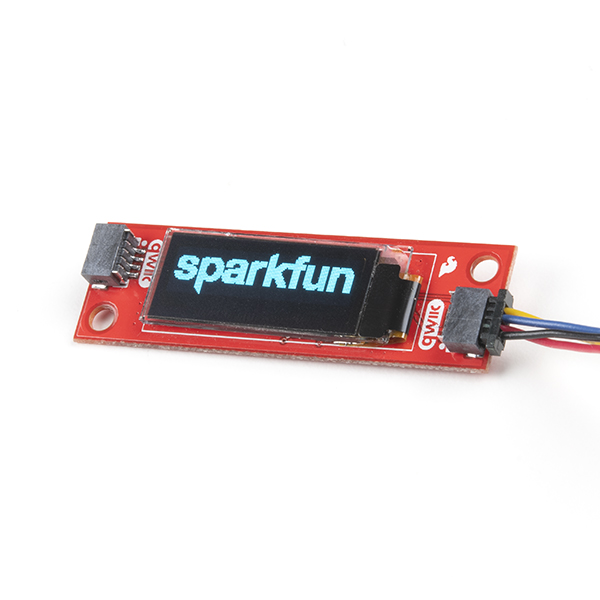
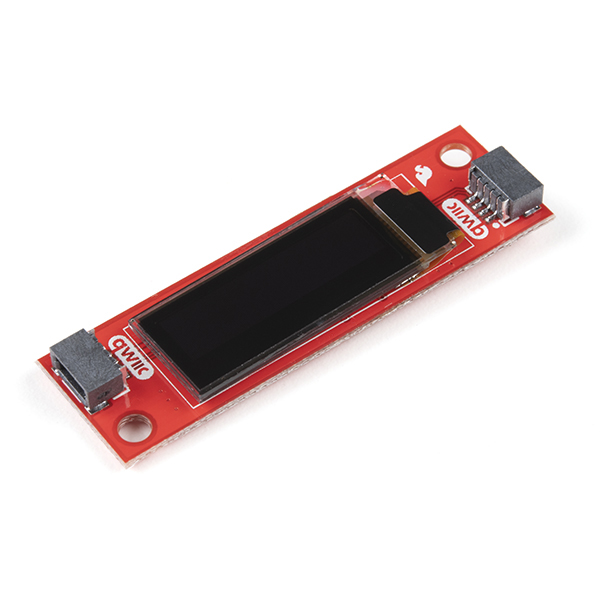
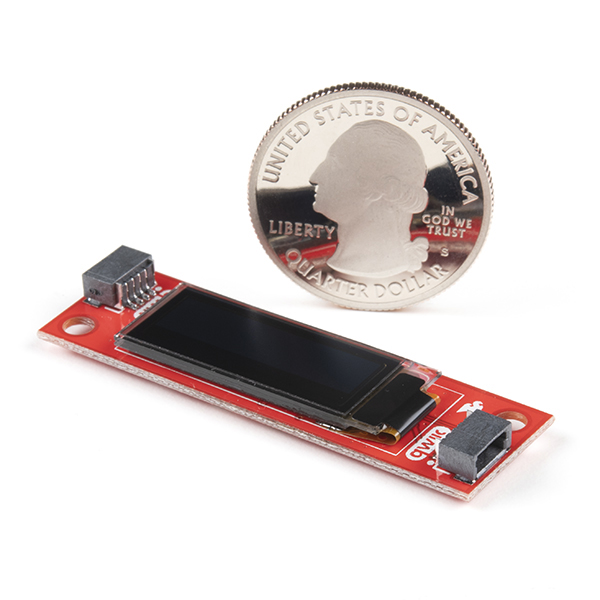
- SparkFun Qwiic OLED Display (0.91 in, 128x32)


SparkFun Qwiic OLED Display (0.91 in, 128x32)
The SparkFun Qwiic OLED Display can display up to three lines of text and features 128x32 pixels in a small 0.91” (diagonal) frame. As an OLED, this display does not have a back light layer (unlike LCDs) and therefore it’s thinner, consumes less power, and has higher contrast.
Thanks to an I2C command structure, the board's firmware maintains speed by updating only the part of the screen that changes This is the same concept use with "Dirty Rectangles" or "Bit blit" operations in computer graphics.
The SparkFun Qwiic Connect System is an ecosystem of I2C sensors, actuators, shields and cables that make prototyping faster and less prone to error. All Qwiic-enabled boards use a common 1mm pitch, 4-pin JST connector. This reduces the amount of required PCB space, and polarized connections mean you can’t hook it up wrong.
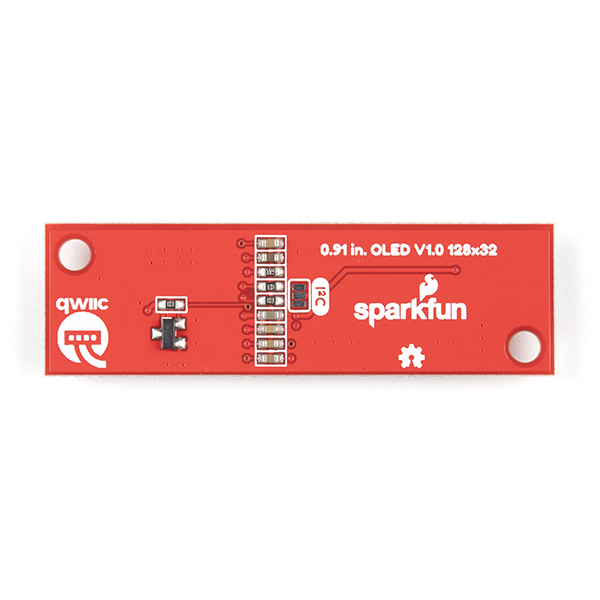
- Communication Protocols: I2C
- IC: SSD1306
- I2C Address: 0x3C
- Dimensions: 50.3 x 15.1mm
- Weight: 5g
SparkFun Qwiic OLED Display (0.91 in, 128x32) Product Help and Resources
SparkFun Arduino UNO R4 WiFi Qwiic Kit Hookup Guide
July 11, 2023
The SparkFun Arduino UNO R4 WiFi Qwiic Kit is a great way to get started with Arduino and the Qwiic-connect system - use this guide to get started!
Wireless Timing Project
September 29, 2022
Time for racing, let's make a wireless timing device using ESP32 wireless communication.
Qwiic Ultrasonic Distance Sensor (HC-SR04) Hookup Guide
March 26, 2021
Get started with the Qwiic Ultrasonic Distance Sensor!
Core Skill: Programming
If a board needs code or communicates somehow, you're going to need to know how to program or interface with it. The programming skill is all about communication and code.
Skill Level: Competent - The toolchain for programming is a bit more complex and will examples may not be explicitly provided for you. You will be required to have a fundamental knowledge of programming and be required to provide your own code. You may need to modify existing libraries or code to work with your specific hardware. Sensor and hardware interfaces will be SPI or I2C.
See all skill levels
Core Skill: Electrical Prototyping
If it requires power, you need to know how much, what all the pins do, and how to hook it up. You may need to reference datasheets, schematics, and know the ins and outs of electronics.
Skill Level: Rookie - You may be required to know a bit more about the component, such as orientation, or how to hook it up, in addition to power requirements. You will need to understand polarized components.
See all skill levels
Comments
Looking for answers to technical questions?
We welcome your comments and suggestions below. However, if you are looking for solutions to technical questions please see our Technical Assistance page.
Customer Reviews
3.8 out of 5
Based on 9 ratings:
1 of 1 found this helpful:
Convenient and super easy to use!
After reading a couple of the negative reviews here I'm compelled to offer my own experience which has been 100% positive.
Qwilic makes this display plug and play, and super convenient for quick experiments or rapid prototyping. The getting started guide had me up and running with an Arduino example in about 5 minutes- the process can be boiled down to: 1) download SSD1306 zip, 2) include the zip as a library, 3) select example code and upload sketch. Simple.
Adafruit's GFX library is high-level and very easy to use. Methods like drawCircle, fillRect, and println make it pretty easy to learn from example code alone. I appreciate the standard and interoperability here- thank you!
Testing with an Artemis, the display seems sharp and responsive.
2 of 2 found this helpful:
Nice display with simple HW and SW interfaces
This tiny (tinier than expected) and bright display added an inexpensive way for my ATmega32u4 project to provide visual feedback to the end user. It also helped by eliminating the need for using a PC and Serial Monitor during troubleshooting. Because of the small size of the display, I found that setting the display to show two lines of 2x size text works better than three lines of 1x size text.
What I did not like was having to download additional libraries in order to use it with the Arduino IDE. Hopefully future releases of Arduino IDE will allow automatic library download/install. For example, when I add #include <Adafruit_SSD1306.h> to my code to allow communication with this display, future version of Arduino IDE can automatically download the necessary libraries instead of providing me with error message.
Great display overall; works as well as other Zio products, and the shape was also more convenient for attaching to different wearables and other objects. The red color pcb is a fun change
0 of 1 found this helpful:
Not very fun
I think I'm "competent" in programming with Arduino IDE, in so far as I have a handful of other things I've installed libraries for off of the github. A few different temp/hu sensors, clocks, servos, etc. The IDE these days is pretty easy, aside from having to remove that annoying little - in the folder name beforehand. All those libraries install, and the examples just compile and work. When I #include them into my own code, they just work like the examples.
I have no idea why these libraries don't like playing on my computer (Linux) but I chased error messages for maybe an hour before giving up. Can't find the I2C header..Can't find the SPI header..after chasing those around, variables came up out of scope, even though they were global in the header...
Aside from that, the documentation is Alice's Wonderland of links. Maybe I'm spoiled with products that have all the libraries, schematics, eagle files, and everything else that could possibly be needed all under the Documents tab of the product listing? Finding yet another library that is supposed to support the other two on a page 3 links away from the product page was the last straw for me, especially since it was the 3rd library that didn't play well in my sketchbook. Does it really have to take three imported libraries, anyway?
I believe either the libraries need improvement or the coding skills need to be upgraded. I'm glad I anticipated this problem and bought the LCD with backpack, extra 10 bucks for a product that just works so I can get on with it.
0 of 1 found this helpful:
Inadequate support
As a previous reviewer said, the support for this product is very poor. The links point to Adafruit libraries, which is typically a sign of trouble. After installing three different libraries, the code simply does not compile for the Sparkfun Redboard Artemis ATP board (or any other Apollo 3 board I tried). Apparently, several functions, including digitalPinToPort and digitalPinToBitMask, are not defined. Waste of time and money.
0 of 1 found this helpful:
Unusable
No connector provided with it. Proprietary socket on the device that's too small and fiddly to consider unsoldering in order to put an available connector. Cant use this and I'm not forking out $10 postage to buy an overpriced $1.50 connector
great little oled
put it in my piunora. https://www.printables.com/model/103358-piunora-cm4-case
using with pi pico
Works totally as expected using circuitpython
Easy to use!
The small and slim design of this display makes this display my first choice for a quick drop-in debug, monitoring or sensor data screen especially for projects where I don't need a big display or want it only on the Qwiic bus while getting the rest of the project to work. Really compact and efficient design. Good job here! Even thinking about using it for a new wearable project.
Just a thought... It might have been cool to mount the Qwiic connectors on the other side of the board to allow for panel mounting.
True about the connector needs to be on other side 😂 The connector is thicker than the monitor itself.
This seems to be working, the docs are not as good as some of the others. It works.
I bought mine last year with the idea of having the thing display some activities for a Raspberry Pi project. Suffice to say it works. Although I did use the Python3 code created by the good people at Adafruit, for that, after ascertaining that the device was seen by the Pi Zero W via the tools for I2C work. To attach to the Pi Zero W I used a Qwiic cable that uses Female Dupont Connectors, at the other end.
The provided Display Library and Example Code give me an error when uploaded. Asked the question on the forum but no response. Please help.
Buyer beware! The sparkfun / Qwiic_Micro_OLED_Py Python driver doesn't support this SparkFun Qwiic micro OLED.
My panel will not power up when connected to a wall outlet. Only when connected to the PC that has arduino running. Any suggestions?