This information can also be found on our new Qwiic Py GitHub Repo. Make sure to head over there after reading about it!
The SparkFun Qwiic Python package aggregates all Python Qwiic drivers/modules to provide a single entity for Qwiic within a Python environment. The Qwiic package delivers the high-level functionality needed to dynamically discover connected Qwiic devices and construct their associated driver object. That means that Raspberry Pi, NVIDIA Jetson Nano, and Google Coral can now, all implement the SparkFun Qwiic Connect System through Python!
New to Qwiic? Take a look at the entire SparkFun Qwiic ecosystem.
Structure
Each Qwiic board has an independent driver library that implements the required logic for the specific board. This driver implementation is structured as a Python package that supports standard Python package management operations and tools. Additionally, each driver is deployed in a distinct GitHub repository, which provides a central area for package management and development.
To provide dynamic discovery and instantiation capabilities, the Qwiic package imports all the underlying Qwiic driver packages at runtime. As such, the Qwiic driver packages must be installed prior to using this package. These packages can be installed manually, or the overall package will install them automatically when using a "PyPi" based package manger (aka pip).
Dependent Modules
To make development and evaluation easier, the modules this package is dependent on are included in this repository as git submodules. This allows rapid checkout and access to the entire Qwiic Python ecosystem if needed.
This structure has the following layout:
Qwiic_Py/
    +--- drivers/
    |       |--- qwiic_bme280                --> The qwiic_bme280 submodule
    |       |--- qwiic_micro_oled            --> The qwiic_micro_oled submodule
    |       `--- ... links to qwiic driver submodule repositories
    |
    +--- qwiic_i2c/                                   --> Link to the qwiic_i2c submodule repository
    |      |--- __index__.py
    |      `--- ... The cross platform I2C bus access driver
    |
    +--- qwiic/
    |      |--- __index__.py
    |      `--- ... Package Implementation
    |
    +--- README.md
    +--- setup.py
    `--- ...etc
Dependencies
The Qwiic package depends on the Qwiic I2C driver: Qwiic_I2C_Py
This package is also dependent on the driver packages contained in the drivers directory.
Installation
PyPi Installation
This repository is hosted on PyPi as the "sparkfun-qwiic" package. On systems that support PyPi installation via pip, this package is installed using the following commands for all users (note: the user must have sudo privileges):
sudo pip install sparkfun-qwiic
For the current user:
pip install sparkfun-qwiic
This process will also install all modules the Qwiic package requires for operation, including the needed Qwiic driver packages.
Local Installation
To install, make sure the setuptools package is installed on the system.
Direct installation at the command line:
python setup.py install
To build a package for use with pip:
python setup.py sdist
A package file is built and placed in a subdirectory called dist. This package file can be installed using pip.
cd dist
pip install sparkfun_qwiic_-<version>.tar.gz
Example Use
import qwiic

results = qwiic.list_devices()

print(results)
>>  [(61, 'Qwiic Micro OLED', 'QwiicMicroOled'), (91, 'Qwiic CCS811', 'QwiicCcs811'),
>>  (96, 'Qwiic Proximity Sensor', 'QwiicProximity'), (119, 'Qwiic BME280', 'QwiicBme280')]

# Create a Micro OLED driver object using the I2C address of the board.
mydevice = qwiic.create_device(results[0][0])

print(mydevice)
>>  <qwiic_micro_oled.qwiic_micro_oled.QwiicMicroOled object at 0x751fdab0>


Just following up on a few items
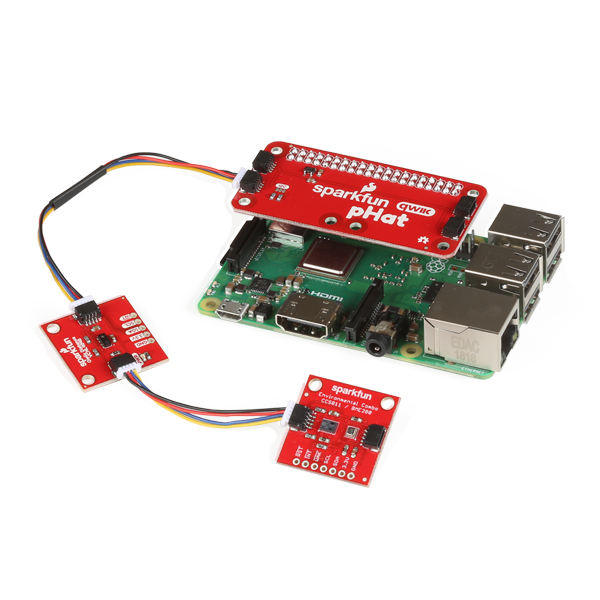
This is just an initial release of the qwiic package. It was focused on supporting the contents of our new Qwiic Kit for Raspberry Pi.
Over the summer support will be added for the entire qwiic ecosystem and going forward, new boards will support Python when launched.
Also, this python package will support CircuitPython and MicroPython, with some initial steps for this already existing internally at SparkFun.
We have also created and published a GitHub template that outlines how to build a new driver for the qwiic python system: Qwiic Python Template. While intended for internal use, it might be helpful for members of the community.
-Kirk
Thank you, Kirk! I'm looking forward to seeing more boards supported, as well as more boards!
FYI - A beta of the Qwiic Keypad, which you mentioned earlier, got posted this afternoon: Qwiic_Keypad_Py. Or just install using pip: pip install sparkfun-qwiic-keypad
Hi, Thanks, Kirk! Coincidentally. I just finished porting the CircuitPython class for the Qwiic Keypad to use Qwiic Py. It wasn't too hard. Is there a process for the community to submit code?
Very Interesting. I have been porting some Qwiic Arduino libraries to use Adafruit's CircuitPython. Currently I have CircuitPython libraries for the Qwiic Joystick, Qwiic 12-Button Keypad, Qwiic Single Relay, Qwiic Twist Rotrary Encoder and Qwiic AS3935 Lightning Detector available. The RTC module and SerLCD is on my todo list. I have a Qwiic Adapter solder to my SerLCD display and it works great.
I will to take a look to see how to support or migrate to this new framework, but hopefully it shouldn't be too hard.
In the meantime, anyone is welcome to look at these projects on git hub for more details. The include installation instructions, documentation and examples for using these Qwiic sensors with Adafruit CircuitPython on Raspberry Pi.
https://github.com/fourstix/Sparkfun_CircuitPython_QwiicKeypad
https://github.com/fourstix/Sparkfun_CircuitPython_QwiicJoystick
https://github.com/fourstix/Sparkfun_CircuitPython_QwiicTwist
https://github.com/fourstix/Sparkfun_CircuitPython_QwiicRelay
https://github.com/fourstix/Sparkfun_CircuitPython_QwiicAS3935
Thank you! You definitely brought a smile to my face! Unfortunately, due to "family health issues", I don't expect to have time in the near future to do such development myself. I probably won't get to looking at your Repos until sometime next month, but thanks again for making your efforts available!
BTW, on the RTC, Linux has pre-defined time value structures (which Arduiino does not, since it does not have any form of "hardware clock"), and system calls for reading/setting the both the RTC and the "system" times (and dealing with timezones versus UTC time). IMHO, it would be best to make use of these tools. Some readers might not be aware of the documentation in the "man" pages (short for manual pages).
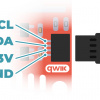
Please forgive my ignorance... If I use a Python QWIIC hat and connect it to an Arduino QWIIC shield (both Sparkfun products), do I still need to worry about the 5V to 3.3V issue? Thanks
Broken: Could not install packages due to an EnvironmentError: 404 Client Error: Not Found for url: https://pypi.org/simple/sparkfun-qwiic-ublox-gps/
Ah, sorry about that. The package was renamed => https://pypi.org/project/sparkfun-ublox-gps/. The new submodule has been added to Qwiic_Py.
Try installing the package again. =)
Glancing through the GitHub Repo, it seems pretty "bare bones" right now. I'd really like to see more modules supported (e.g., the Real Time Clock Module, the 12 Button Keypad, and the Joystick would be welcome).
Maybe some sort of a guide on how to develop the necessary code would encourage the "community" to contribute...
As a thouight, maybe using the Qwiic Adapter to interface one of the SerLCDs would be useful (since the Qwiic connectors are conspicuous by their absence on SerLCDs).
I hope you don't take this as any sort of attack -- I'm just try8ing to offer my thoughts for how it could be improved!
Hi, I ported the Arduino code for the SerLCD library to CircuitPython, and released it to the CircuitPython Community bundle. The CircuitPython library also supports SPI and UART (Serial) communication as well as I2C. All the Arduino examples were ported to Python.
The code along with installation instructions and other information is available on github here: (github.com/fourstix/Sparkfun_CircuitPython_SerLCD[https://github.com/fourstix/Sparkfun_CircuitPython_SerLCD]
You can install the SerLCD CircuitPython libraries on a Raspberry Pi with the following command: pip3 install sparkfun-circuitpython-serlcd
This CircuitPython library was written on my own time and is open source and free to use.
Enjoy, fourstix
We will be working on adding more boards over the summer. I assume that we will probably end up focusing on new product releases and Qwiic boards at first (I am currently working on a library for the Pi Servo pHAT right now).
I recommend checking out fourstix's comment above. He has been building a few packages over the last few weeks (including the keypad and joystick).
Unfortunately, on the serial LCDs, we didn't adopt the Qwiic system until after we had the design finalized with the manufacturer. Probably in the next revision.